INTRODUCTION ON CAC REGISTRATION
In the article, I will show you step by step how you can do your CAC business registration without hiring any lawyer. There are many types of business one can register with CAC which are as follow. Edited.
- Business Name
- Private Company Limited by shares
- Company Limited by guarantee
- Limited Partnership (LP) Company
- Limited Liability Partnership (LLP) Company
To know the difference about each type of business, kindly check our post titled ” CAC Business Registration“.
But this article is only meant for those that want to learn how they can register a Private Company Limited by shares commonly called ” Limited company”. However if your intention is to register a “Sole proprietorship Business“, kindly check our post titled ” CAC Business Name Registration: Step by step guide” to learn how to can register a Business name without paying anyone.
THE 5 STEPS TO TAKE FOR CAC REGISTRATION
Let’s now get into business. Below are the five (5) steps to follow to register a private company Limited by shares with CAC.
- Public Search
- Creating an Account on CAC Portal
- Name reservation
- Proper Registration
- Payment of registration fee & Stamp duty fee
- Post Registration: Downloading of certificate and related documents
Those are the five (5) steps to take. Now it’s time to start breaking them down one after another.
STEP 1 FOR CAC REGISTRATION: PUBLIC SEARCH
1- SIMPLE NAME SEARCH
The first step to take for any CAC Registration is to check if the name you intend to use for your business is available. Why is it important ?
The reason is very simple. If you pick a name that is already taken, CAC will deny you that name and you will loose money. This is because the name reservation fee is not refundable. So any time you ask CAC to reserve a business name, you will always pay for the name’s reservation fee.
That’s why it’s recommended to always check the availability of the name first. How do you do that? It very simple.
- First, visit CAC public search Portal.
- Second, input your intend business name and click on “search” as indicated in the screenshot below

- After clicking on “search” button, you will be directed to another page. If your proposed business name was taken, you will see it on that page, else you will see an empty page. An empty page means that your proposed business name is not yet taken while page with names similar to your proposed business name means that the name might have been taking as indicated in the below picture.

2-THOROUGH NAME SEARCH
As you can see below, the Business Name (SAMOA) that I intended to use is already taken. But if the page appeared empty, it could be that the business name is still available to be used.
But to be sure that the name is truly available, you to have successively click on “Business Name“, “Company“, “Incorporated Trustees“, “Limited Partnership“, “Limited Liability by Partnership” as indicated on the picture below. If the page appears blank each time you click on those different type of companies you can confidently said that the name is still available and you can go ahead and reserve it.
The above screenshots demonstrate perfectly well what I said earlier. Let’s me explain. While searching for “Life hope Salvation”, the name was not found under “Business Name” neither under “Company“. Which could mean that the name is not taken and that it’s still available. But when you go further, you will realize that the name is registered under ” Incorporated Trustees“. In this case, there is not guarantee that CAC will approve such name even though you want to register it under “Company” as a Private Company Limited by shares.
So always make sure that the proposed business name is not registered at all under any type of business registration before you proceed for proper registration. That is the first step to take for any type of CAC business registration.
STEP 2 FOR CAC REGISTRATION: SIGN UP ON CAC REGISTRATION PORTAL
I- CREATION OF CAC ACCOUNT
The second step is to sign up on CAC registration Portal.
- At this stage, you need to either put in your phone number that is linked to your NIN or your National Identification Number (NIN) itself. If an account was previously created with the same phone number, you will get an message saying “Phone number already taken“. But if you don’t have such message or similar, you can proceed by clicking on “next“. Take a look at the screenshot below for better understanding.

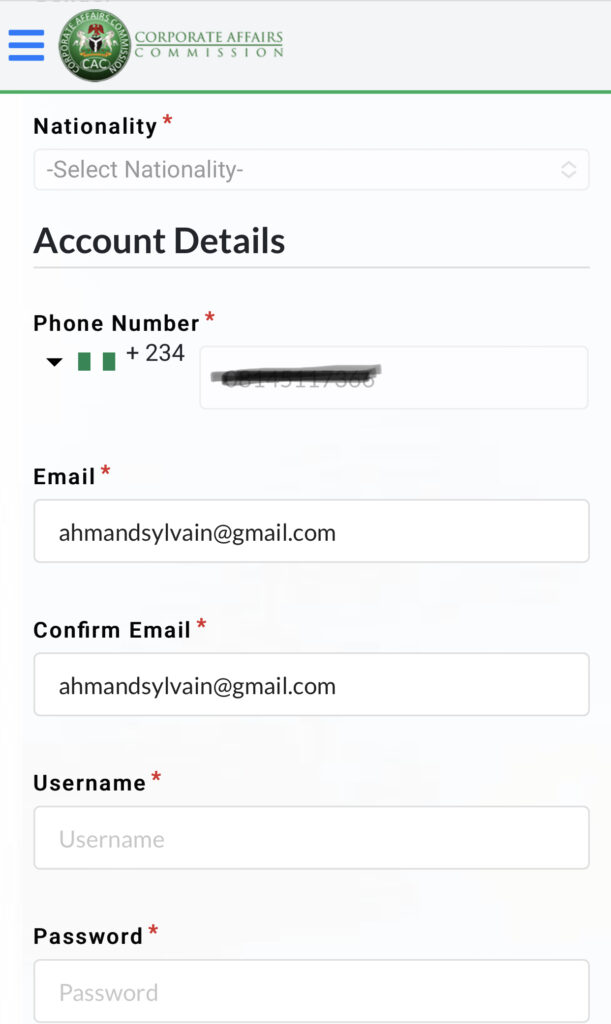
- After clicking on “next” you will be directed to a page similar to the screenshot below. Here you will notice that some of your personal information like your “Surname“, “First Name“, “Date of birth“, etc… are already filled. This is because the CAC Portal and NIN portal are synchronized if you are signing up with your National ID Card.
- As for other information, you will need to fill them including your personal email. Make sure to provide valid email address you always have access to. This is because an email validation message will be sent to you. After all information filled properly click on “register” to create your CAC account as described below.
II- CAC ACCOUNT VALIDATION
- After clicking on “register“, an email will be sent to your email inbox. What you have to do is to click on the email activation link to validate your account and then sign in back. You can sign into your account using either your “email“, “username“, “phone number“. And then press “submit” to go to the next page

- On the next page, you will need to input the password you have initially created and then click on ” Login” as described on the screenshot below.

We’ve now concluded the second step of our CAC registration. Let’s now dive into the third step
STEP 3 FOR CAC REGISTRATION: NAME RESERVATION
The third step for any CAC Registration is to reserve your business name. Without reserving the business name, we can’t proceed for proper registration. For that, we need to go through 4 stages.
I- LOGIN INTO YOUR CAC ACCOUNT
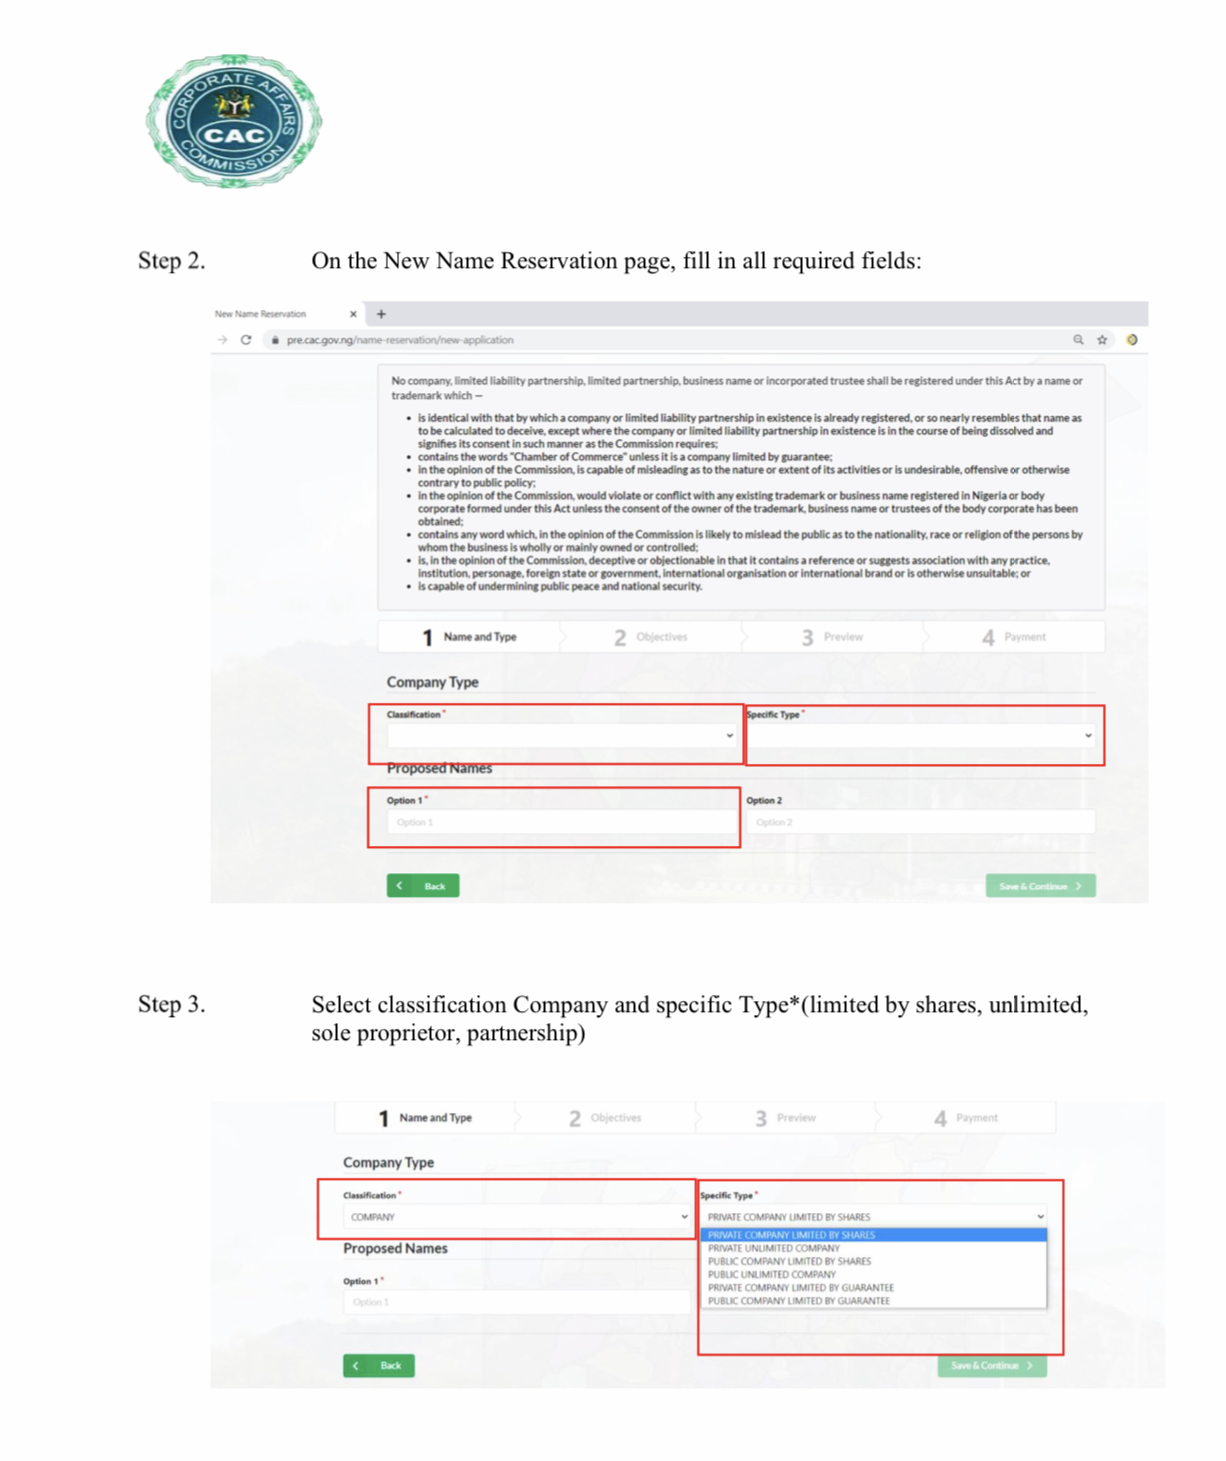
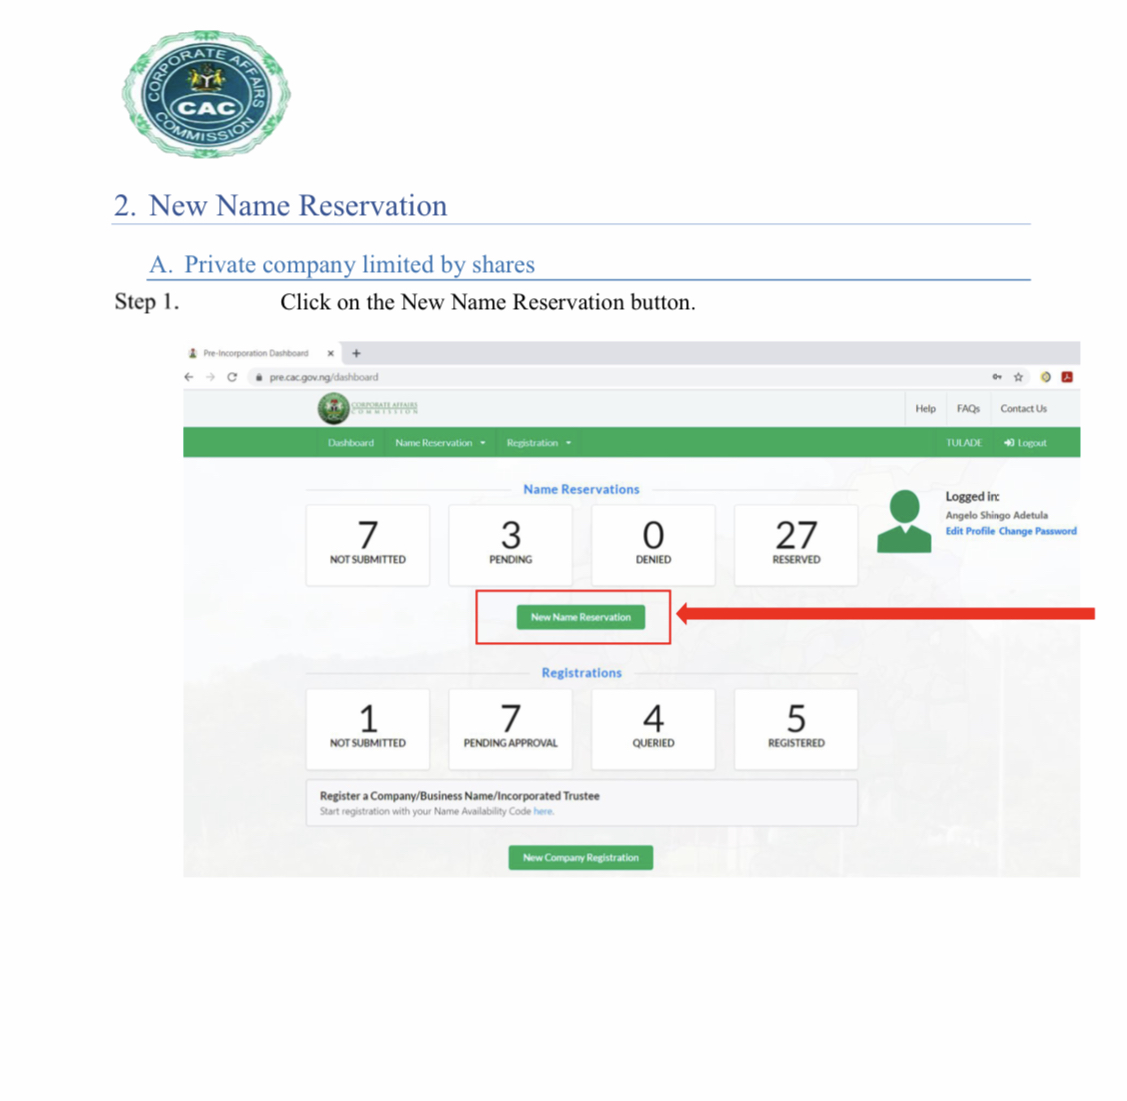
After you have logged into your CAC account, look down where it’s written “New Name Reservation” as showed on the screenshot below. Click on it and you will be landed to another page where you will provide some basic information about your business information. You can take look on the picture below for better understanding
II- PROVIDE SOME BASICS BUSINESS INFORMATION
At this stage of CAC Registration for a company limited by shares, you need to provide some basic information about your business. Those information are as follow:
- Proposed Name (Option 1): Here you need to put in the name you want to give your business.
- Proposed Name(option 2): You have to choose another name different from the first proposed name. The reason this is important is because if the first name is denied, this option 2 may be taken in replacement.
- Classification: Among all the 5 options that will be presented to you, choose “COMPANY” as “classification” because company Limited by shares is what we are going to register.
- Specific Type: As we selected “COMPANY” as “Classification”, here we will have 7 options to choose from. The appropriate type to choose among the 7 is “Private Company Limited by shares“.
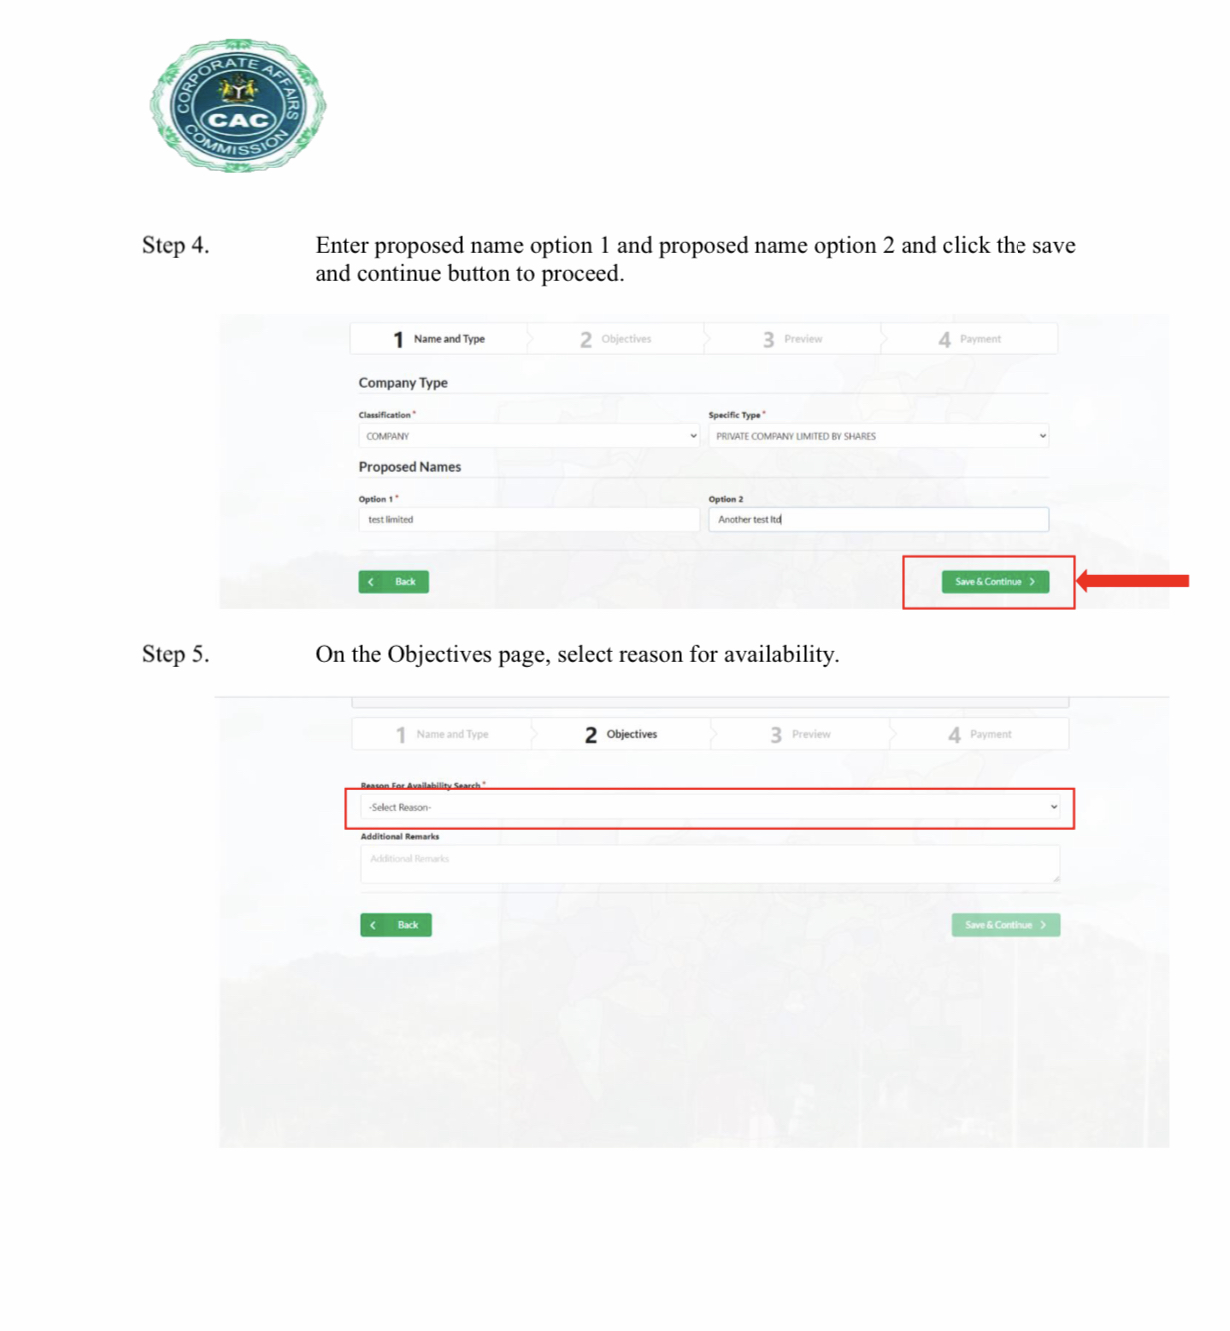
After that, click on “save & continue” to continue the CAC Business name reservation. On the screenshots below you can see all that has been said at this point.
III- REASON OF THE NAME RESERVATION: OBJECTIVE
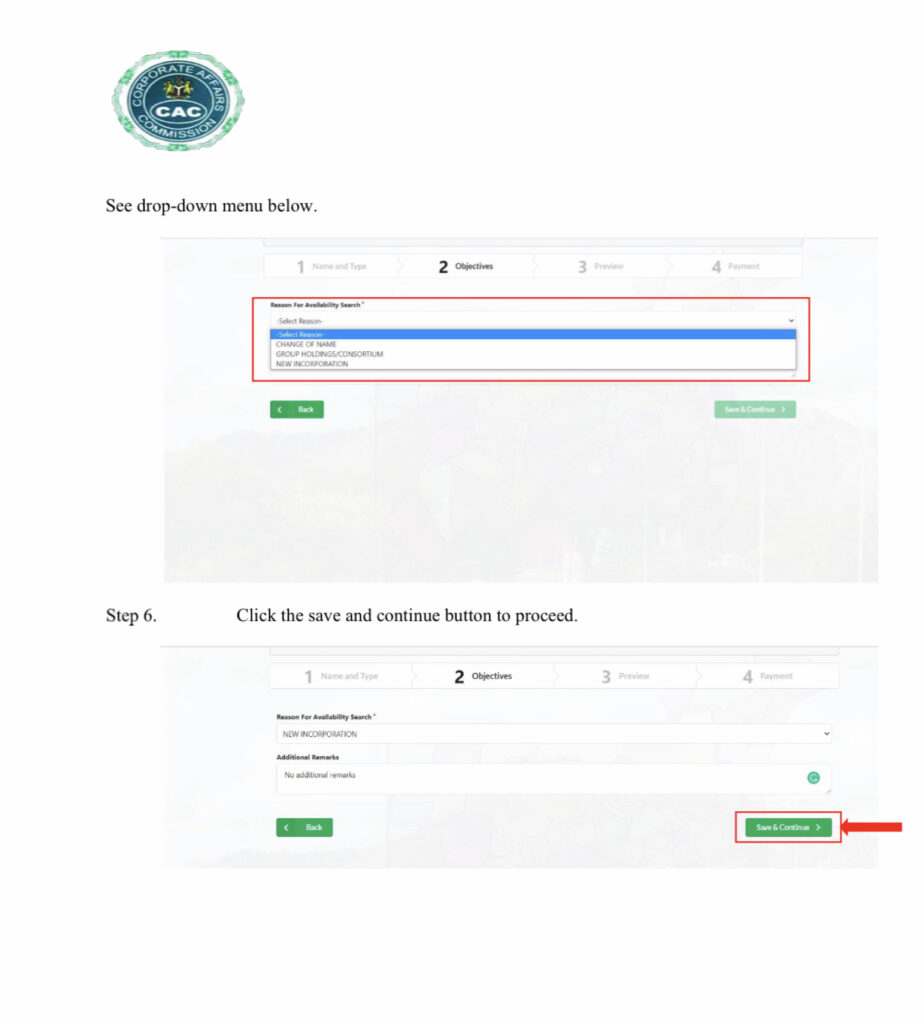
A this point you just need to tell the commission the reason you are reserving the name for. So in the dropdown of ” Reason for Availability search” kindly choose ” New Incorporation/Registration” as we are doing new CAC registration for a Private company Limited by shares. As for the “Additional Remarks” you can leave this blank.
After that you click on “save & continue” to continue your CAC registration as described on the image below.
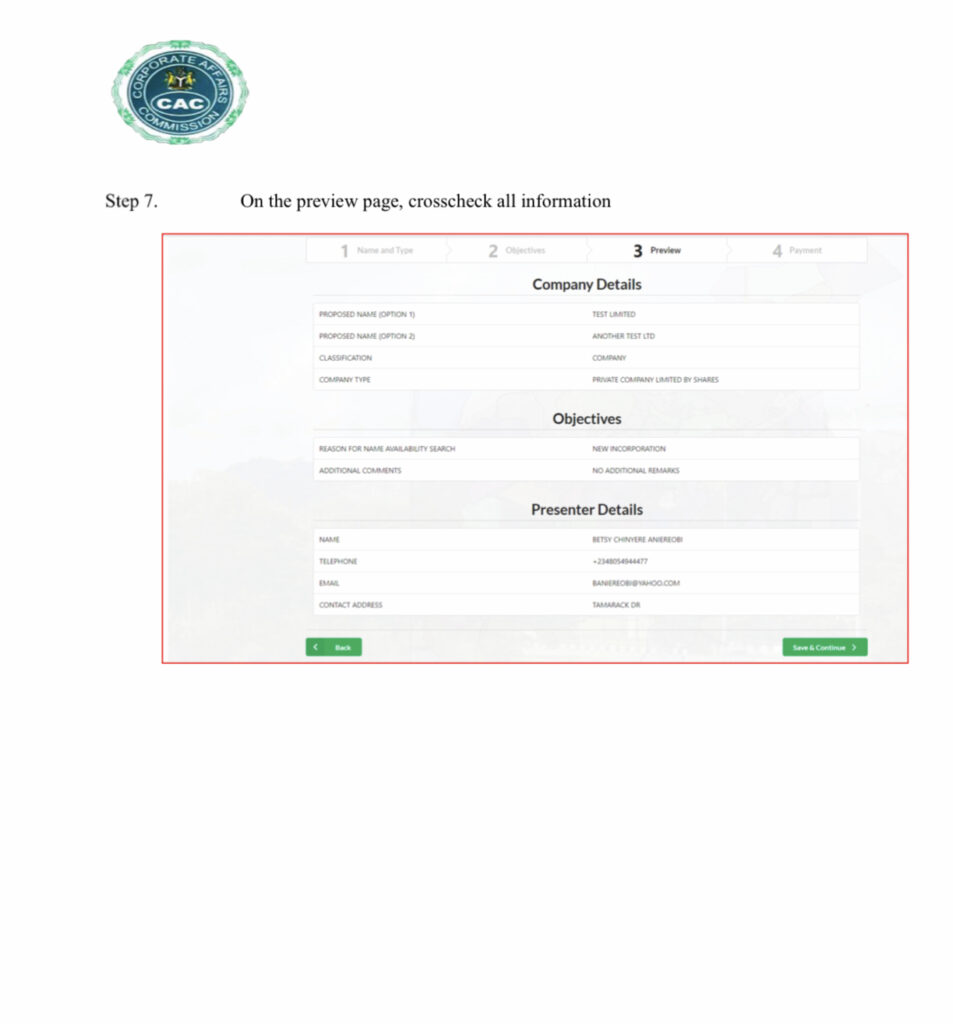
IV- PREVIEW OF ALL INFORMATION
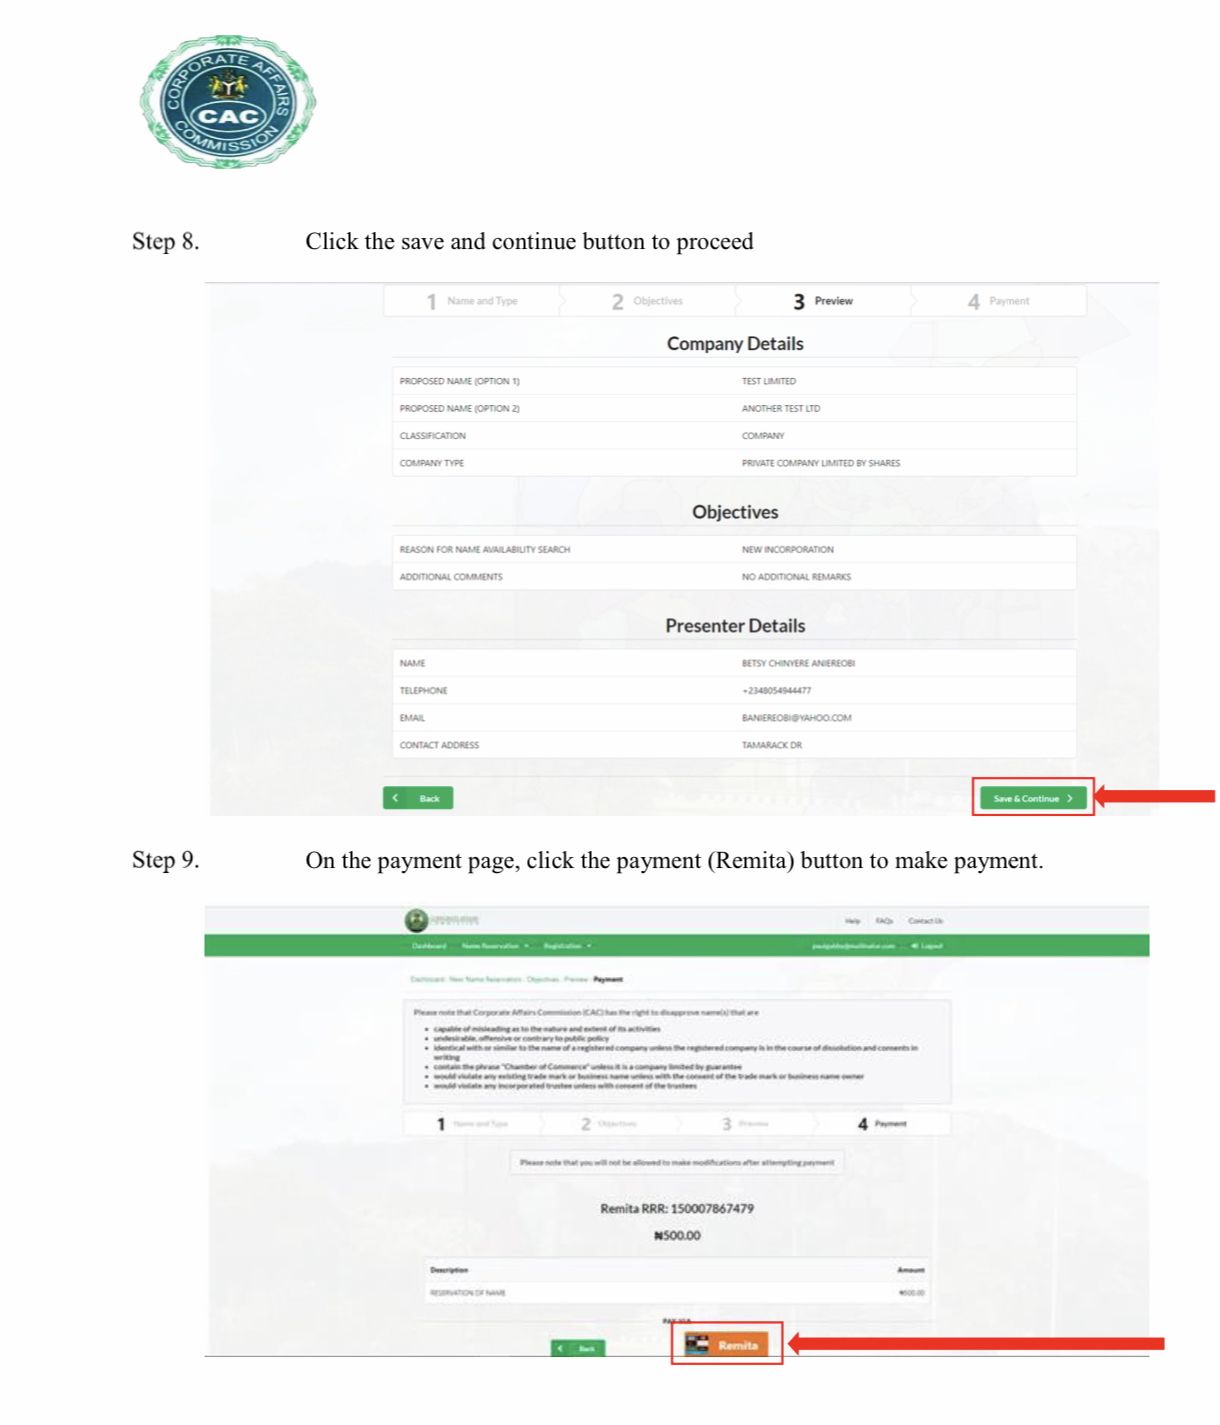
You don’t have much to do here. What you need to do is to review all information you have previously provided. If those information are correct, click on “Save & Continue“. But if you realize that there is typo mistake somewhere, click on “Back” to go back and rectify the mistake. Below is a sample of the preview I’m talking about.
V- PAYMENT FOR NAME RESERVATION
After clicking on “Save & Continue“, you will be directed to the payment page. On this page, you are asked to click on “Remita” as showed on the screenshot below. Then you will access another page which is the proper payment page. There you have many payment options to choose from. Those options are “debit card“, “USSD“, “Direct Bank transfer” or “Wallet“. You choose the one that is convenient for you. As for me I’m used to “Debit card” payment. So if you select that option, all you have to do is to input your card details, and click on “Pay“.
Next, an OTP will be sent to your phone number; use it to complete your transaction. After putting in the OPT, you have to wait awhile for the system to confirm your payment. If the transaction was successful, you will receive “successful transaction” message, else you will receive a “failed transaction” message .
That’s how you can make payment to reserve a name for your business. This also marks the end of the step 3 of our CAC registration for a private company Limited by shares. Now let continue with the proper registration.
STEP 4: PROPER CAC REGISTRATION FOR A PRIVATE COMPANY LIMITED BY SHARES
Two (2) or three (3) days after paying for the name reservation, you need to login into your CAC account to check if the name is approved. You can also consult your email inbox because the commission will send you an email to notify you of their decision whether the name is approved or not. If the name is approved, you will see an availability Code attached to it. What is the availability Code for and how to use it? That’s what you will learn next.
I- HOW TO USE THE AVAILABILITY CODE?
When you get the approval email, login back to your CAC account. Below is what your dashboard will look like
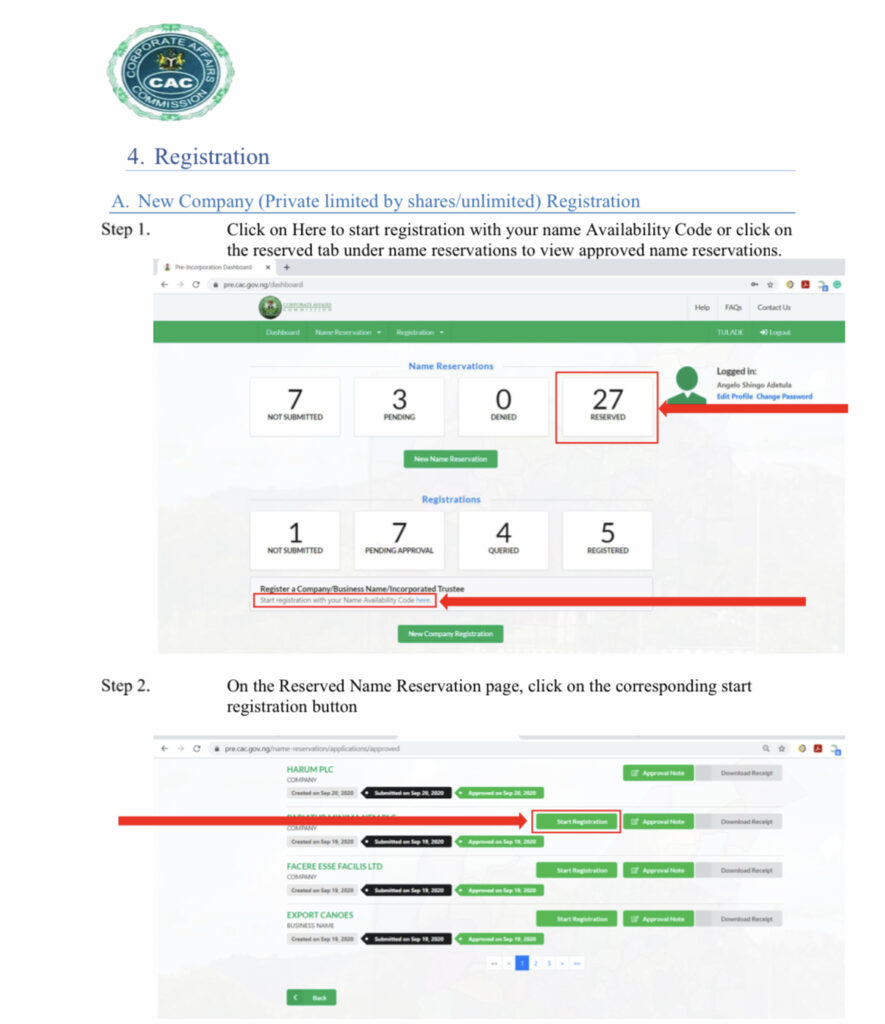
Scroll down and click on either ” Start registration with your name availability code here…” or on “New Company Registration” to start the proper CAC Registration as pointed on the above picture. After clicking you will be directed to another page where you will need to put your availability code.
After inputting the availability code, hit on the “enter button” on your device and your company name will pop up. If you don’t hit the enter button of your device, nothing will pop up and you won’t be able to continue. When your Business Name pops up alongside with mention “Start Registration “, click on this later to continue the CAC Registration.
II- FILL IN YOUR BUSINESS DETAILS
The next screenshot is a lookalike of the page you will be directed to after hitting “Start Registration“, just take a look.
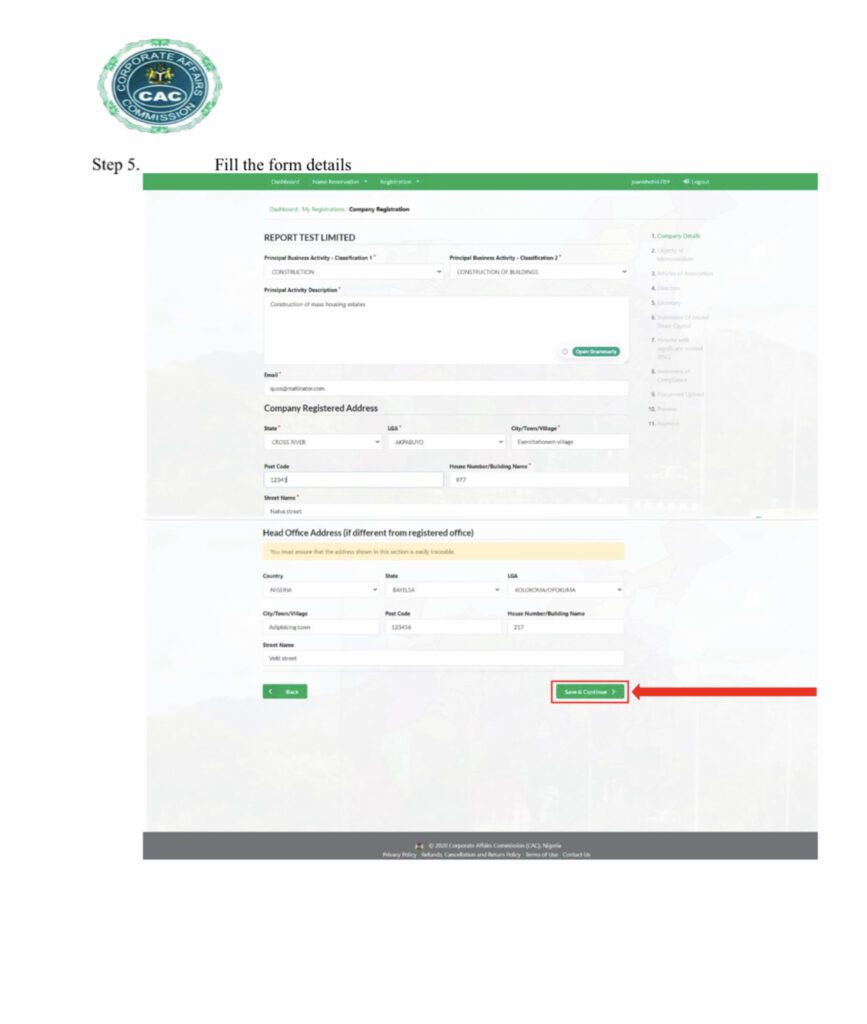
At this point you need to provide information about your business. Those information are as follow:
- Business Commencement Date: There is trap here and I will help you avoid it. The best practice is to use a date that is a month or less away from the date you are doing the registration. For instance if you are doing the registration on 03rd February 2021, you can choose as Business commencement date 15th January 2021. With this practice you won’t start paying tax early.
- Email & Phone Number: You can input your personal email address and phone number here. It doesn’t matter
- Principal Place of Business: Here you need to provide information about the address of your business. If your business doesn’t have a location, you can choose and provide your house address information.
- Branch Address (If any): Do not worry about this. Just leave it blank unless your business has another branch elsewhere.
After providing all necessary information, click on “Save & Continue” to move to the next stage of your CAC Registration for a company limited by shares.
III- OBJECTS OF MEMORANDUM
At this stage, you need to mention the activities of your business. If you have many activities, kindly mention all of them here. For instance, if you are into “fashion design“, “POS business“, “Poultry“, “Car rental service“, “Website design“, etc….. you need to mention them one by one.
How to proceed? Just click on “Add Objects” as indicated on the picture below and input the activity. But mind you, add only one activity at a time. After that, click on “Add“, then click on “Add Objects” to add another activity. Repeat the process until all activities are added. You will be better understand when you take a look on the picture below
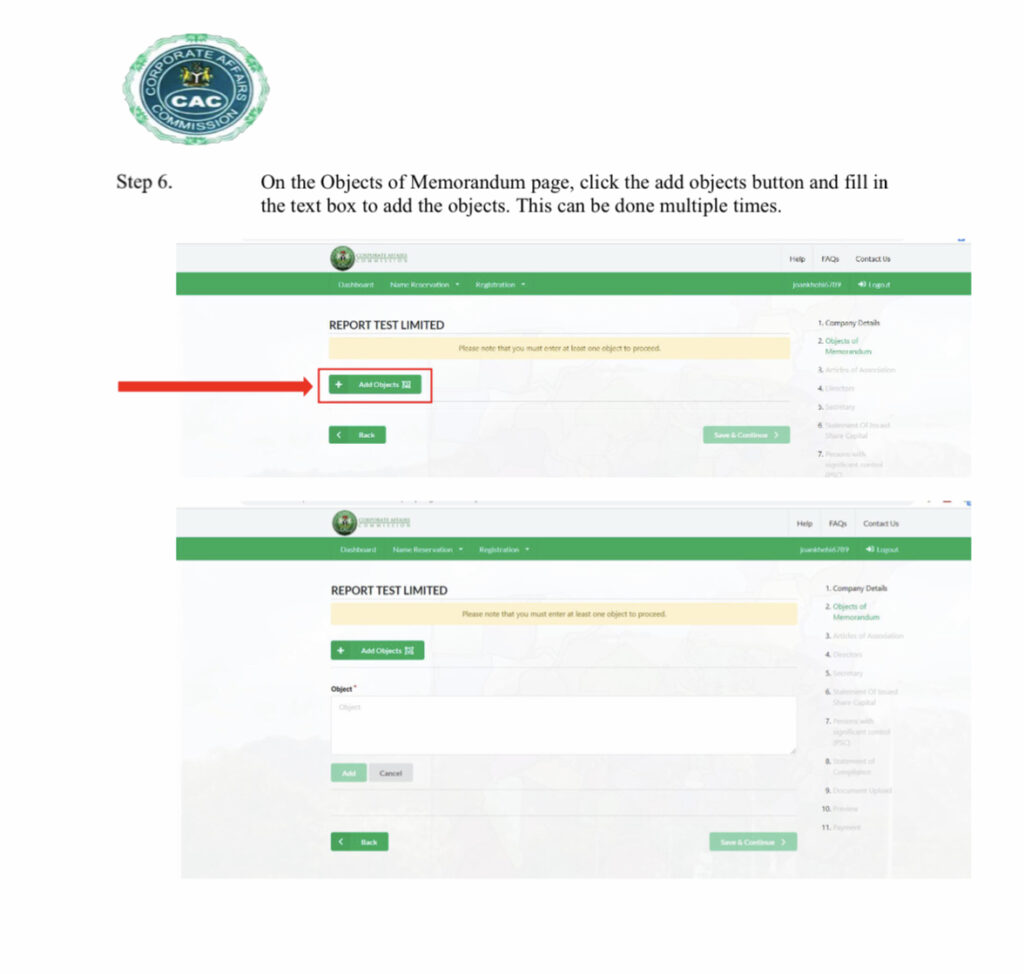
After adding all your business activities, click on “save & continue” to continue your CAC registration.
IV- ARTICLES OF ASSOCIATION
At this stage, you will first need to provide information about the person you are choosing as your witness. While creating a private company limited by shares, the law asks to have a witness. So it’s important to provide some information about your witness while doing your CAC registration. Those information are “Personal details“, “Contact details“, and “address” as indicated on the picture below. After providing those information, you just need to click on “Add witness“, then click on ” save & continue“.
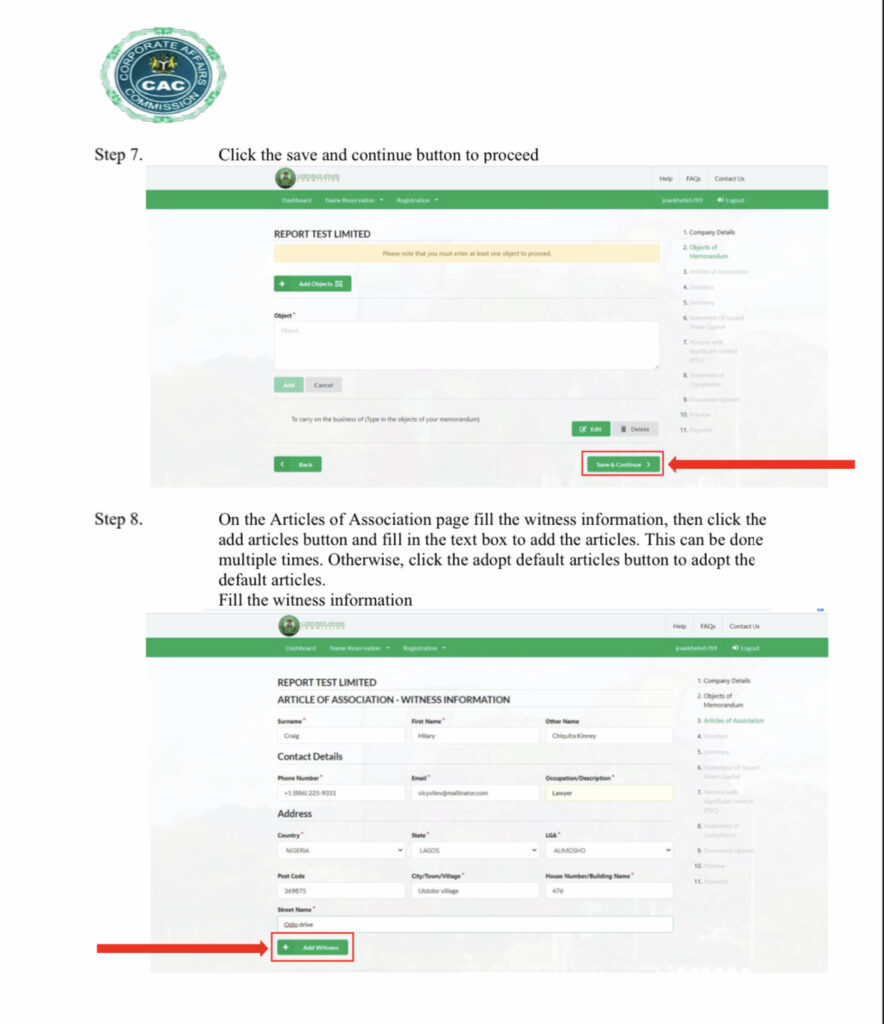
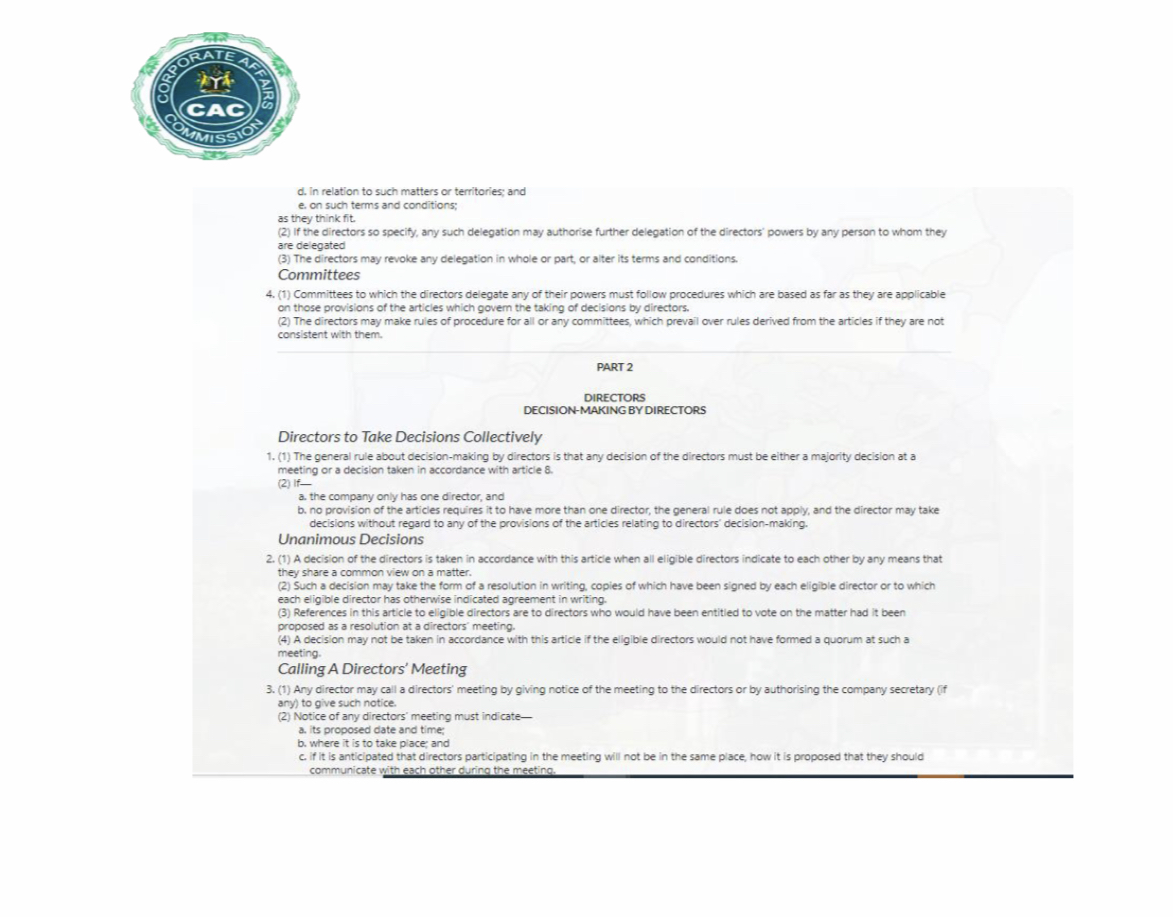
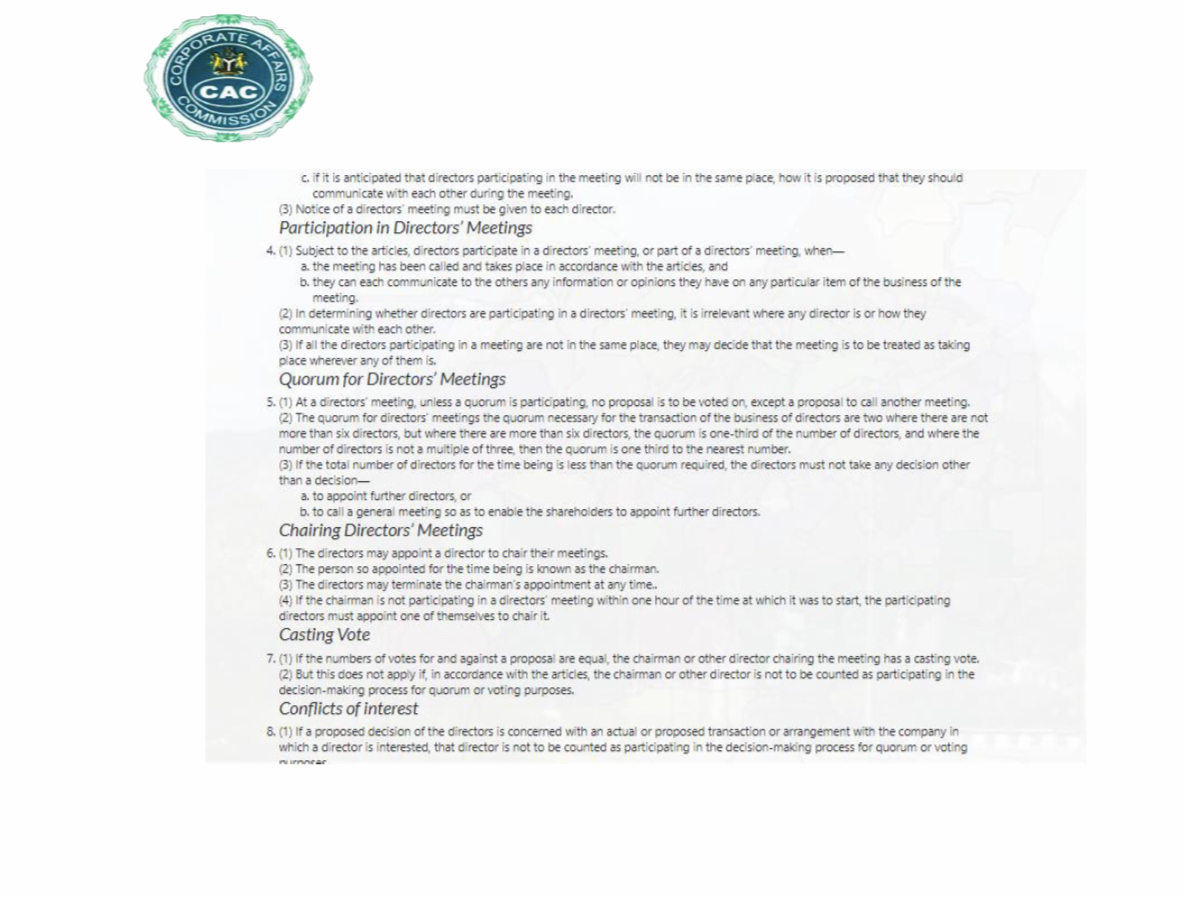
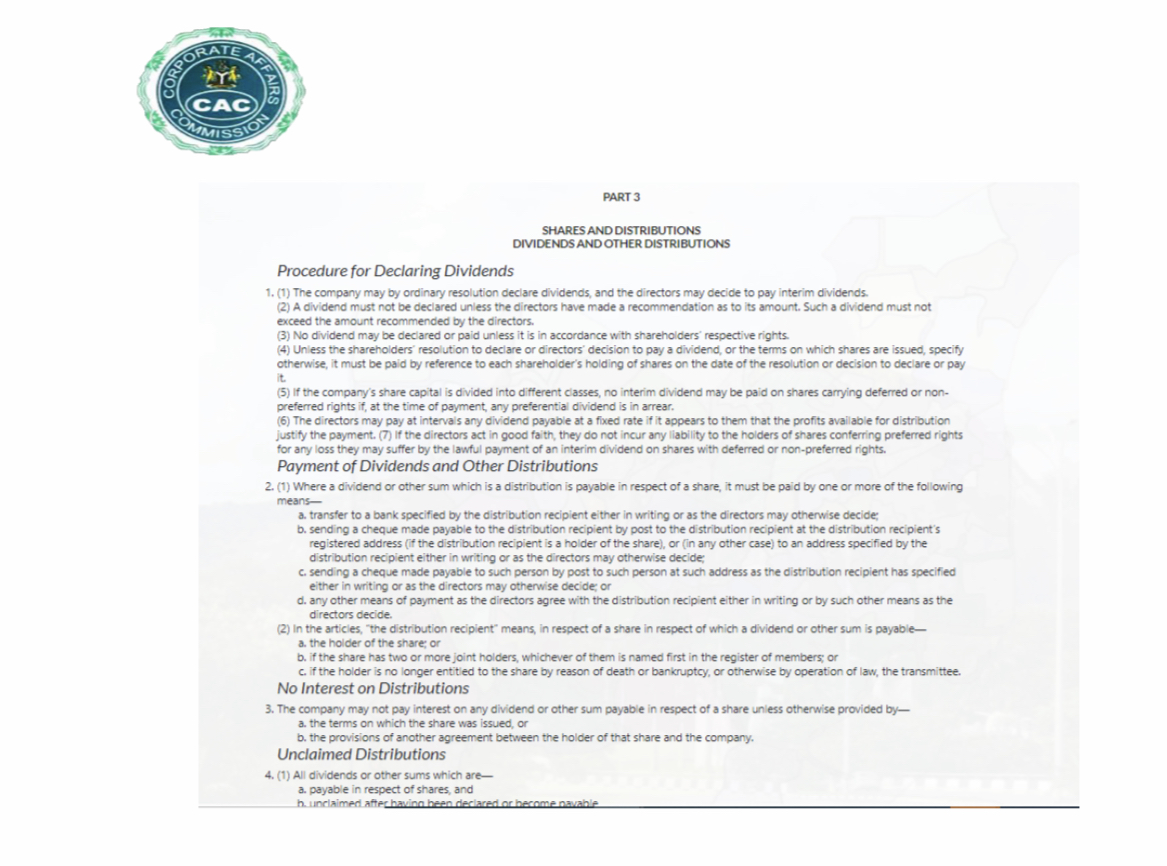
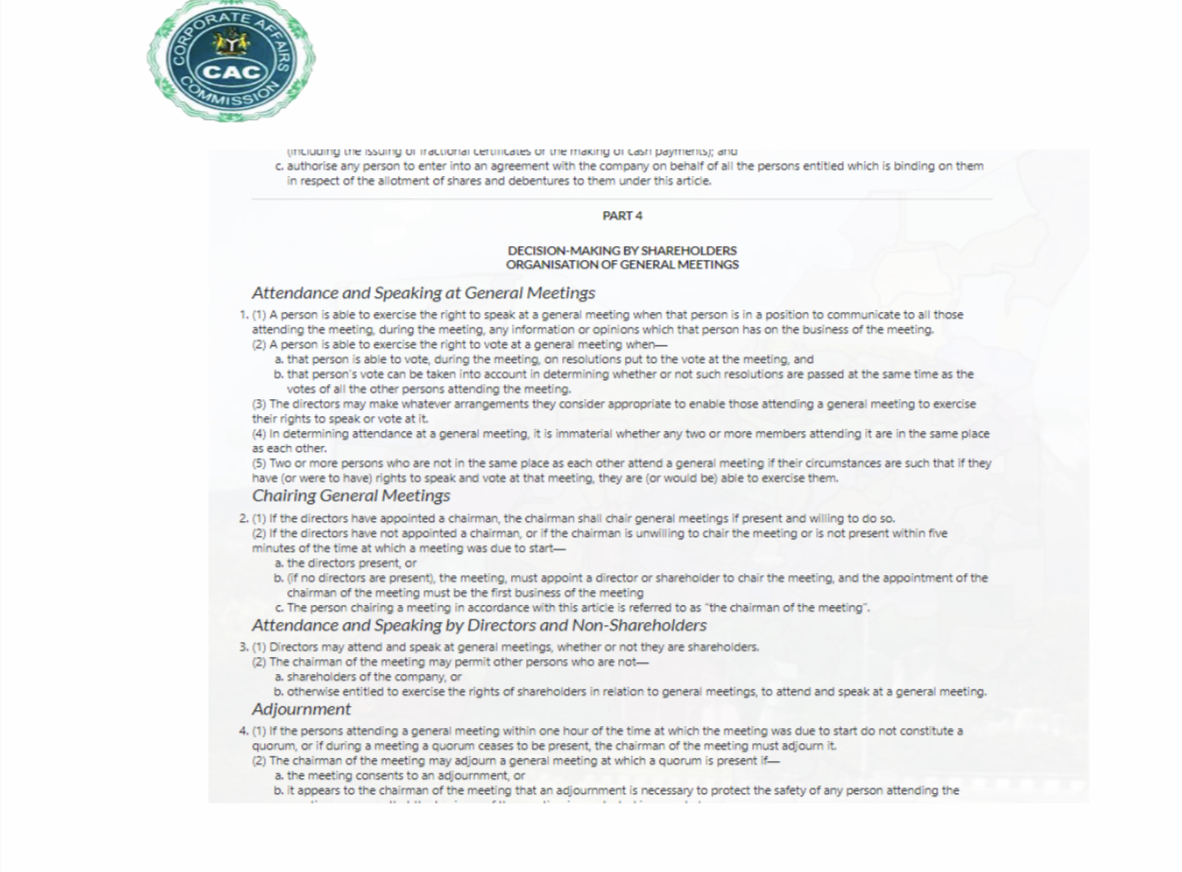
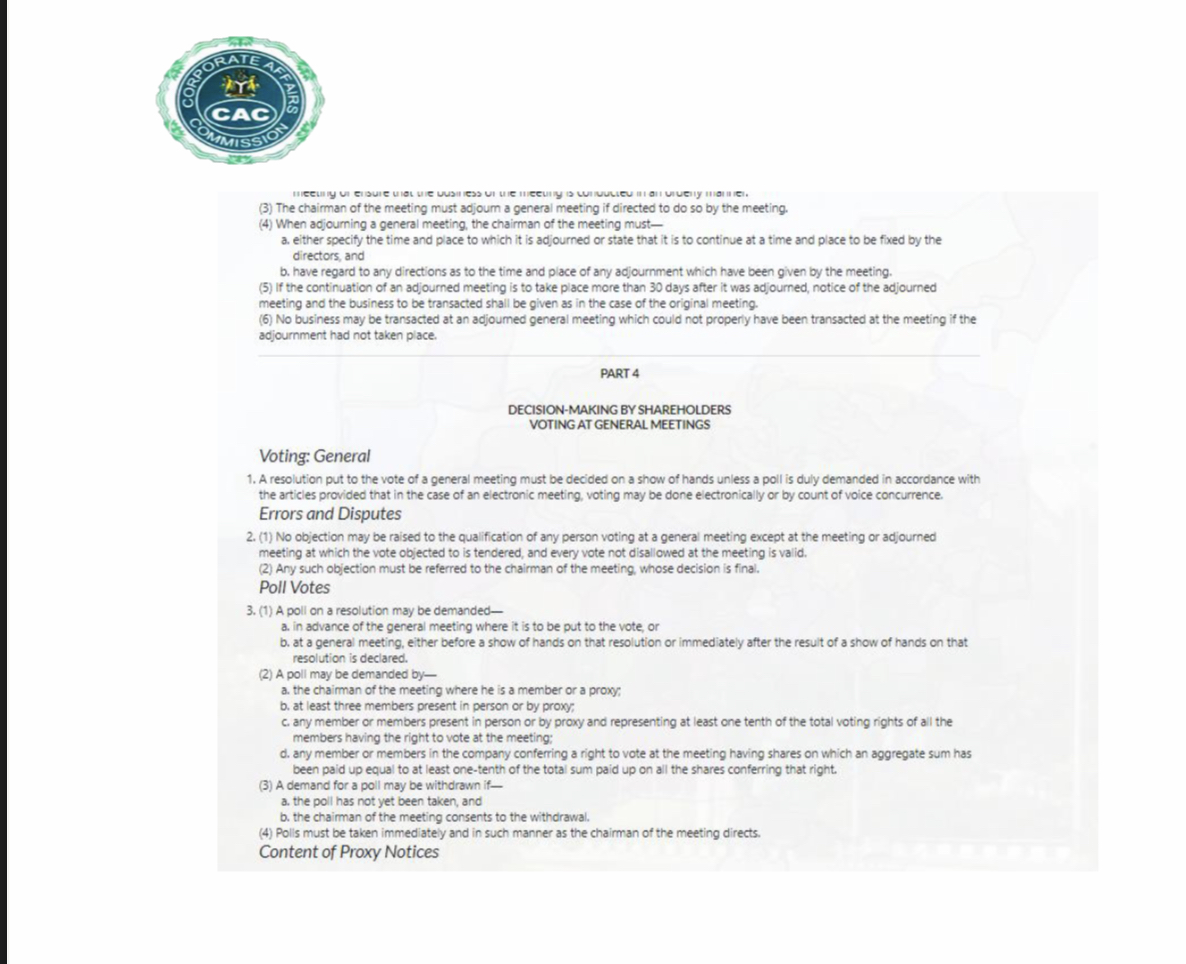
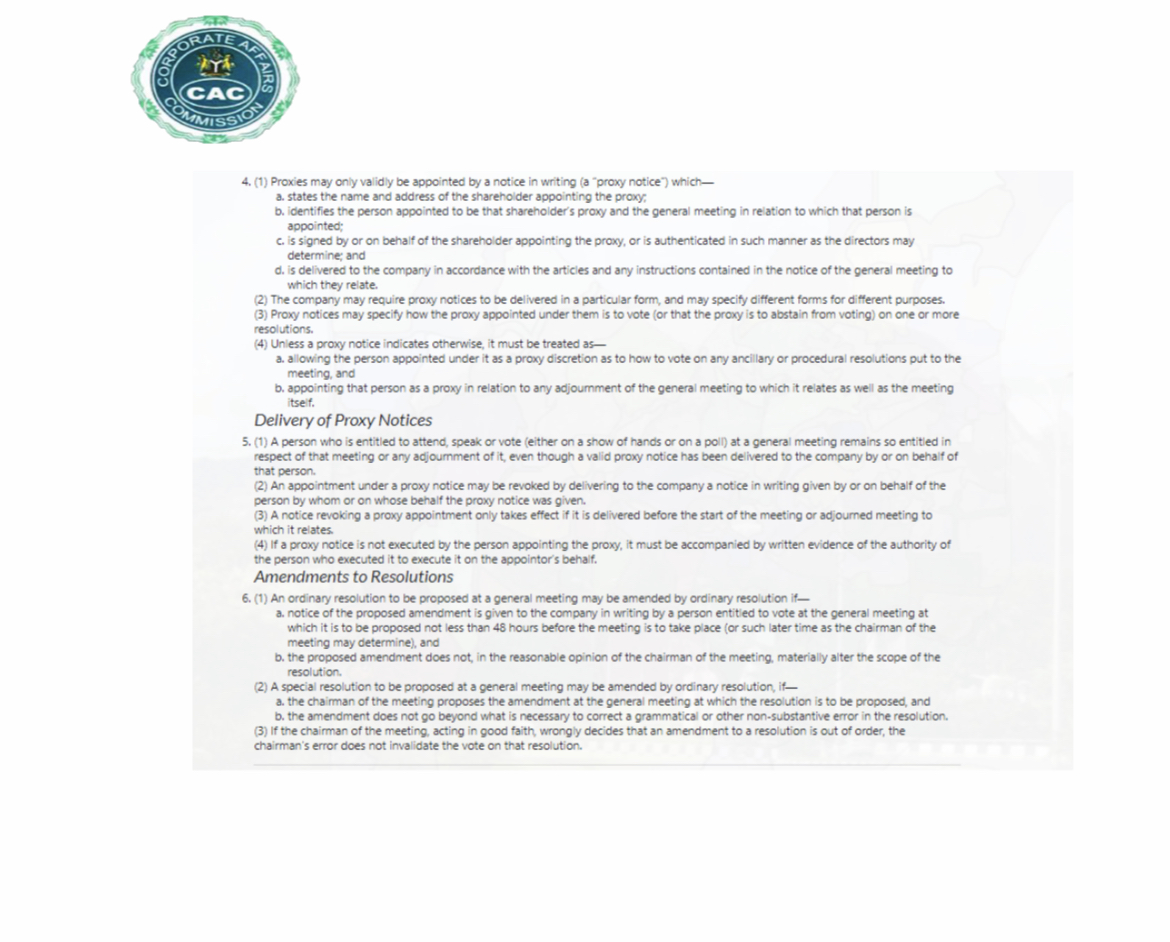
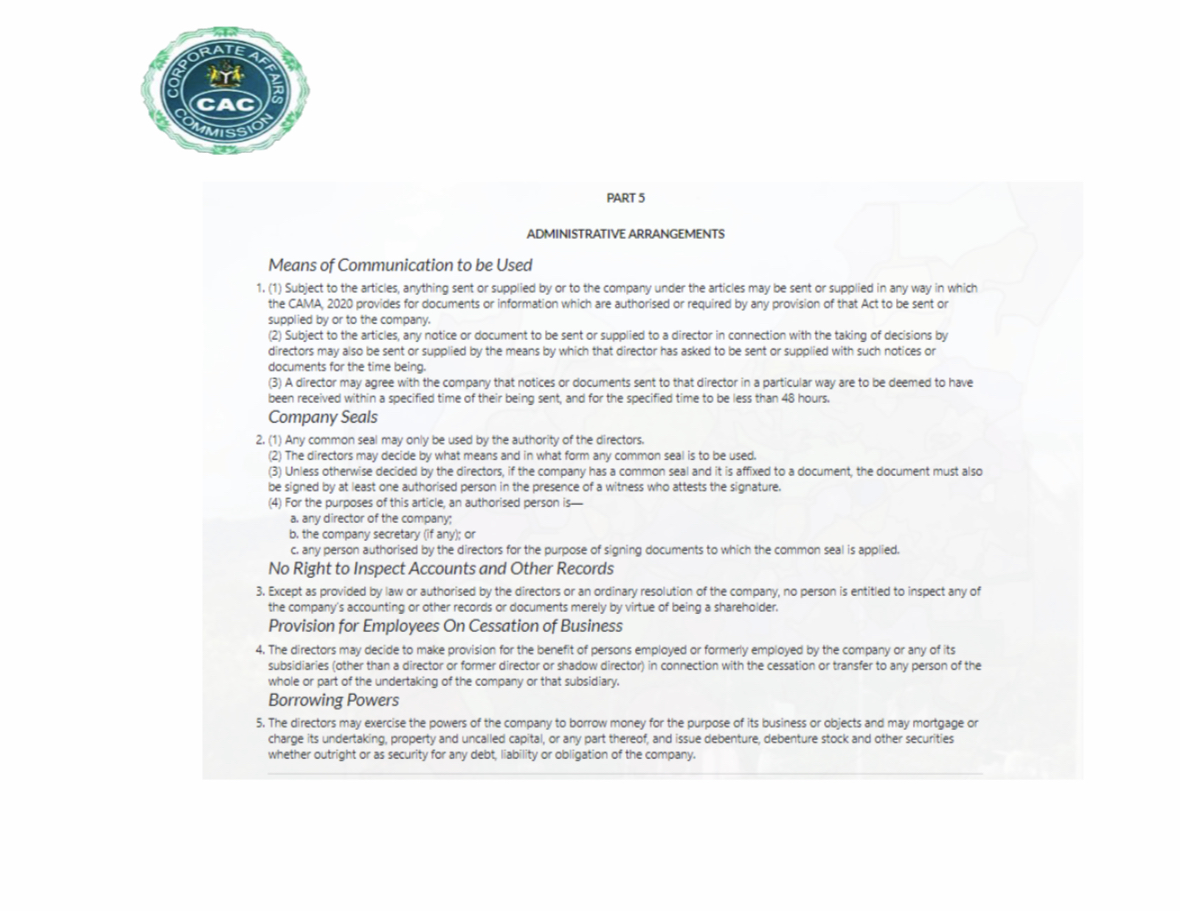
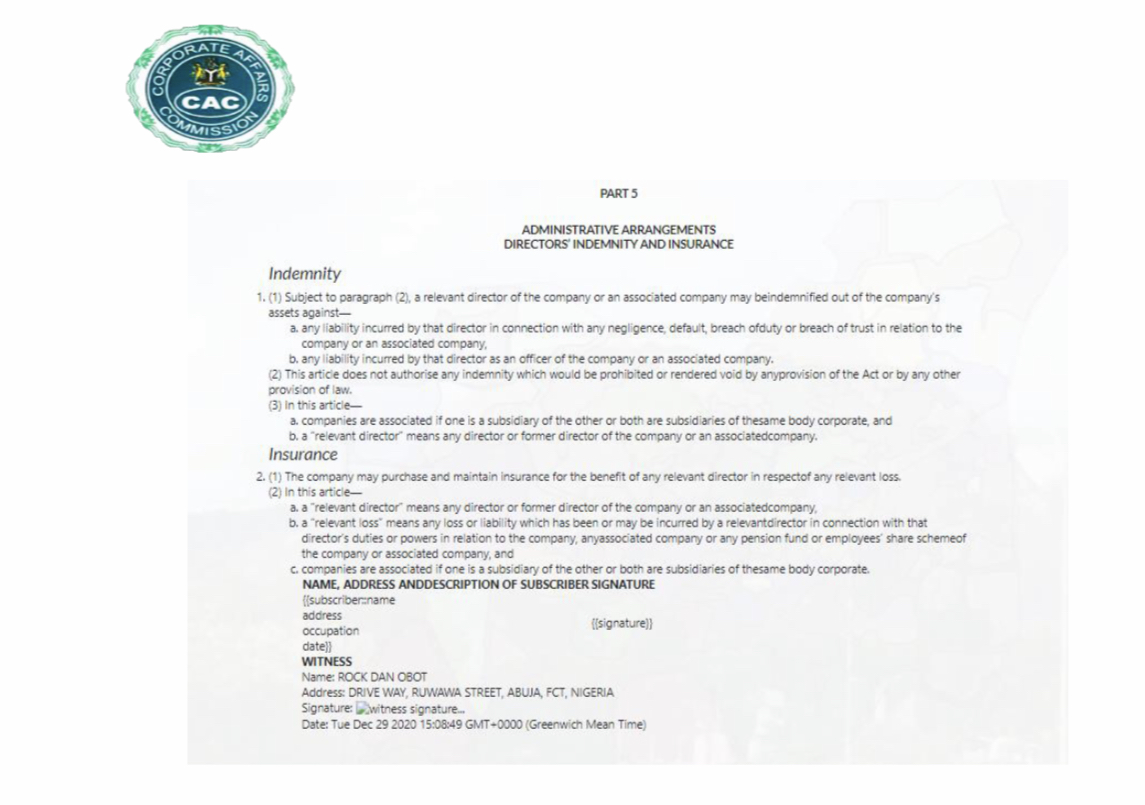
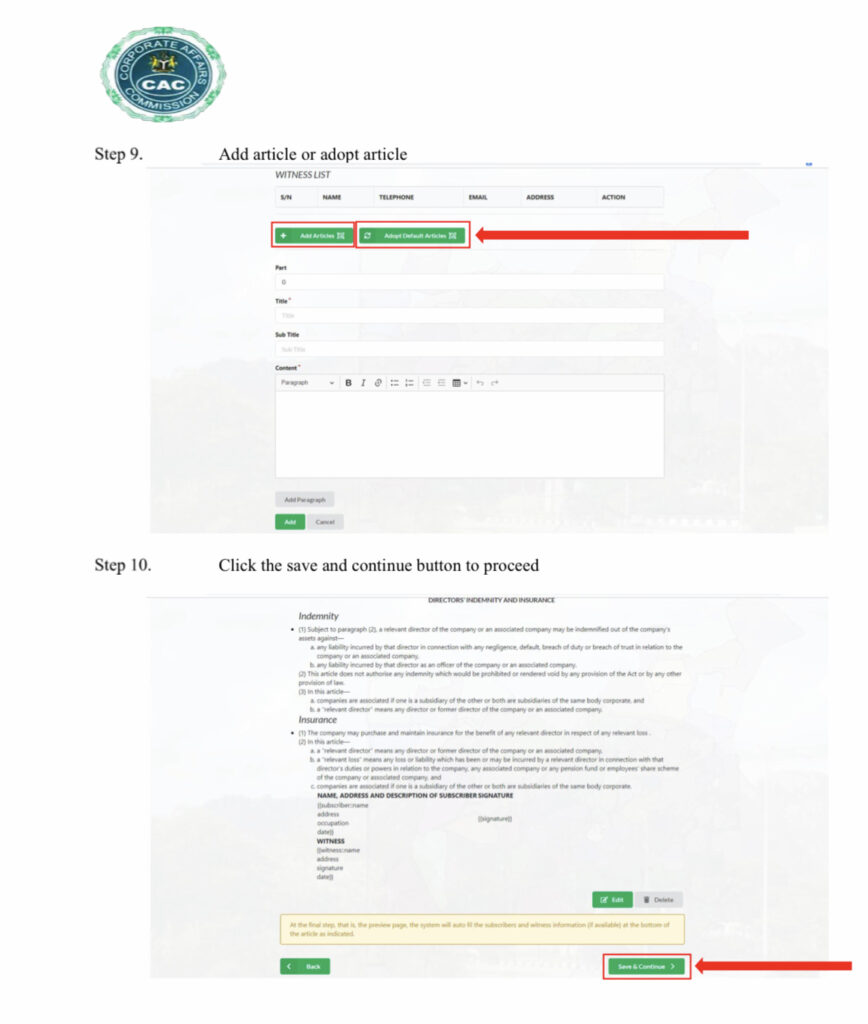
After clicking on “save & continue“, you will land to the proper “articles of association” page. Here you have the option to adopt a “default articles” that the commission has already written or you just write yours. In most cases, people adopt the “default articles” to save time and to avoid stress. So if you are also adopting the “default articles” as well, just click on “Adopt Default Articles“, and then click on “save & continue“.
But if you want to go ahead with your own articles, click on “Add Articles“, then write them one after another. After that, click on “Add“. When you finish adding all your articles, click on “save & continue” to continue with your CAC registration. For more clarification, take a look on the pictures below.
V- DIRECTORS
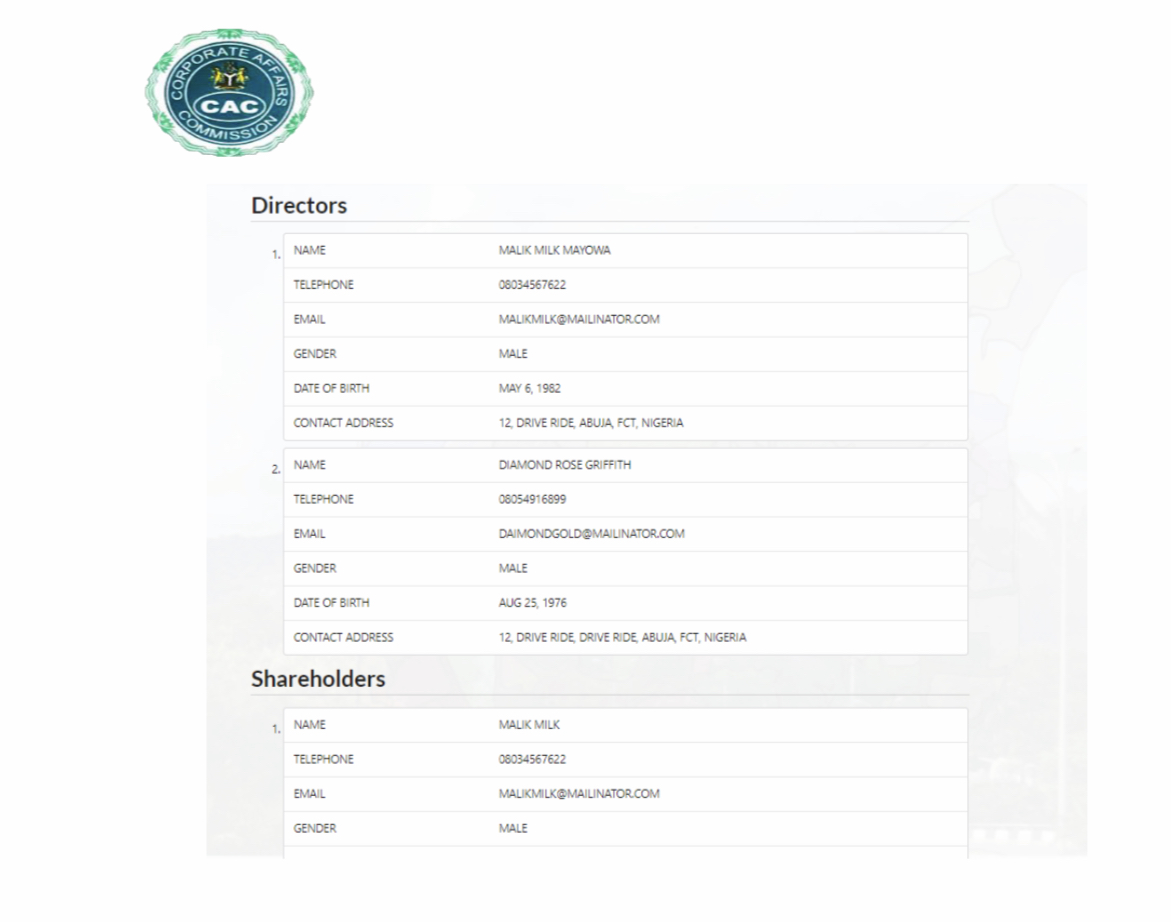
Here you need to add the details information of those that will manage your company (directors). As private company limited by shares, you can be the sole director as you can also have more than one director. If you are the sole director, you don’t need to add any other person as director. in that case, you will automatically see your name appears here as director.
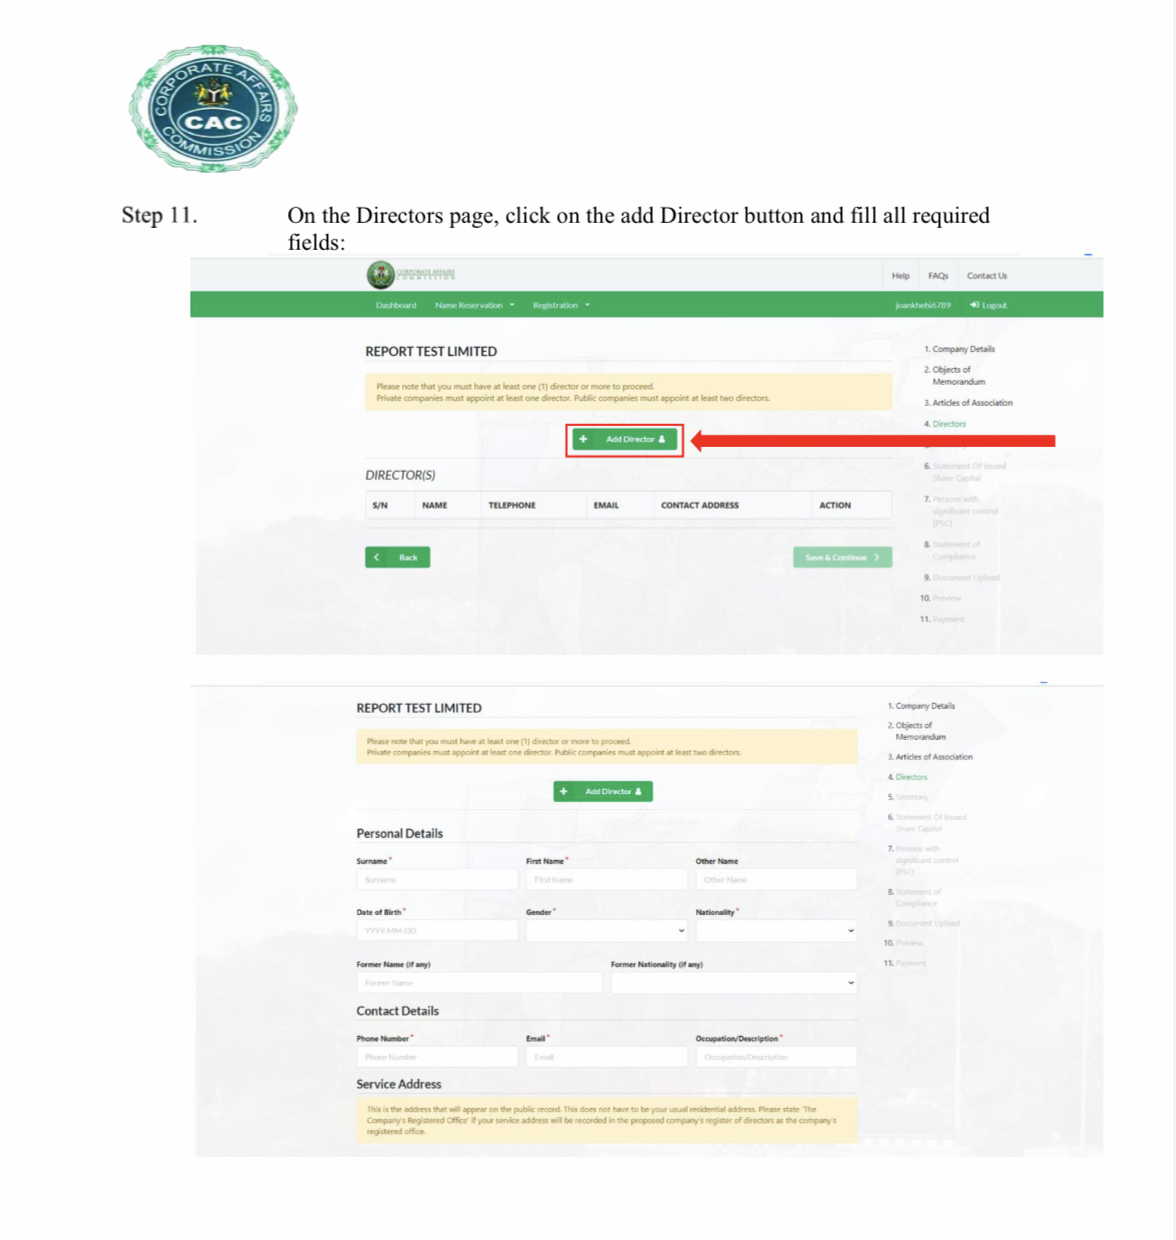
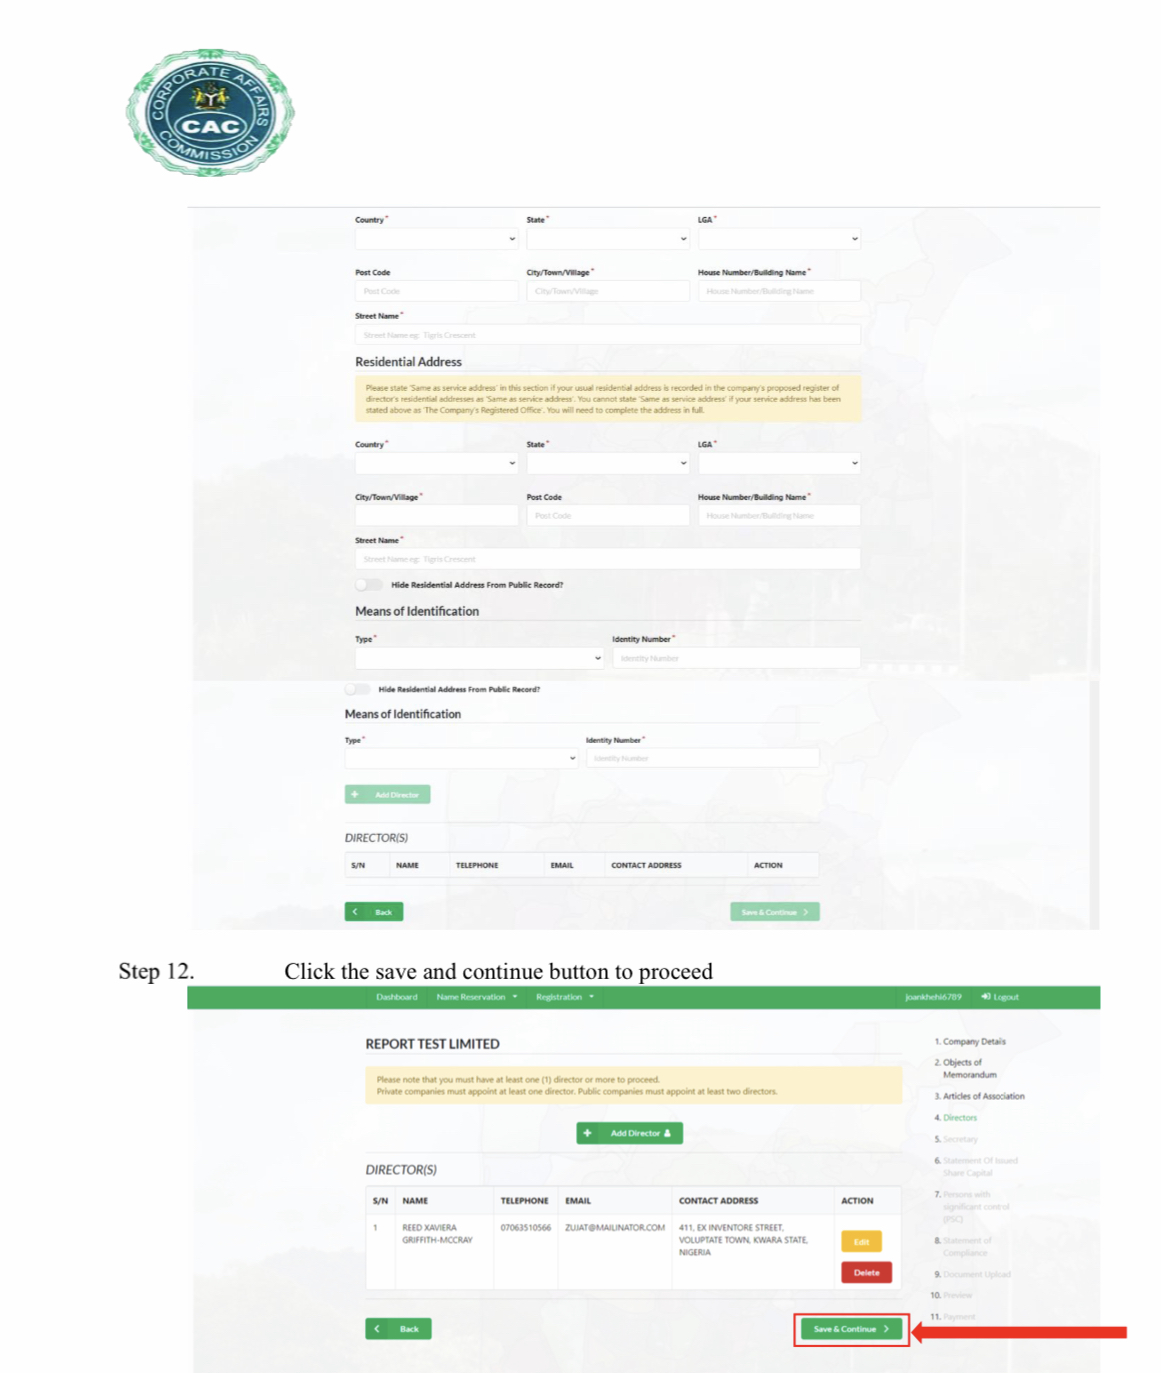
But if you have two (2) or more directors, apart from your personal details which you don’t need to add here, you will need to add the details of other people you choose as directors. Do this one after another by clicking on “Add directors“, then fill all required fields. Each time you add the details of a director, you will see the summary under “Directors’ section“.
After adding a director, if you realize some mistakes, just click on “edit” to rectify the mistake and then click on “Add“. When you are done adding all directors, click on “save & continue” to continue with your CAC registration. Take a look on the pictures below for better understanding
VI- SECRETARY
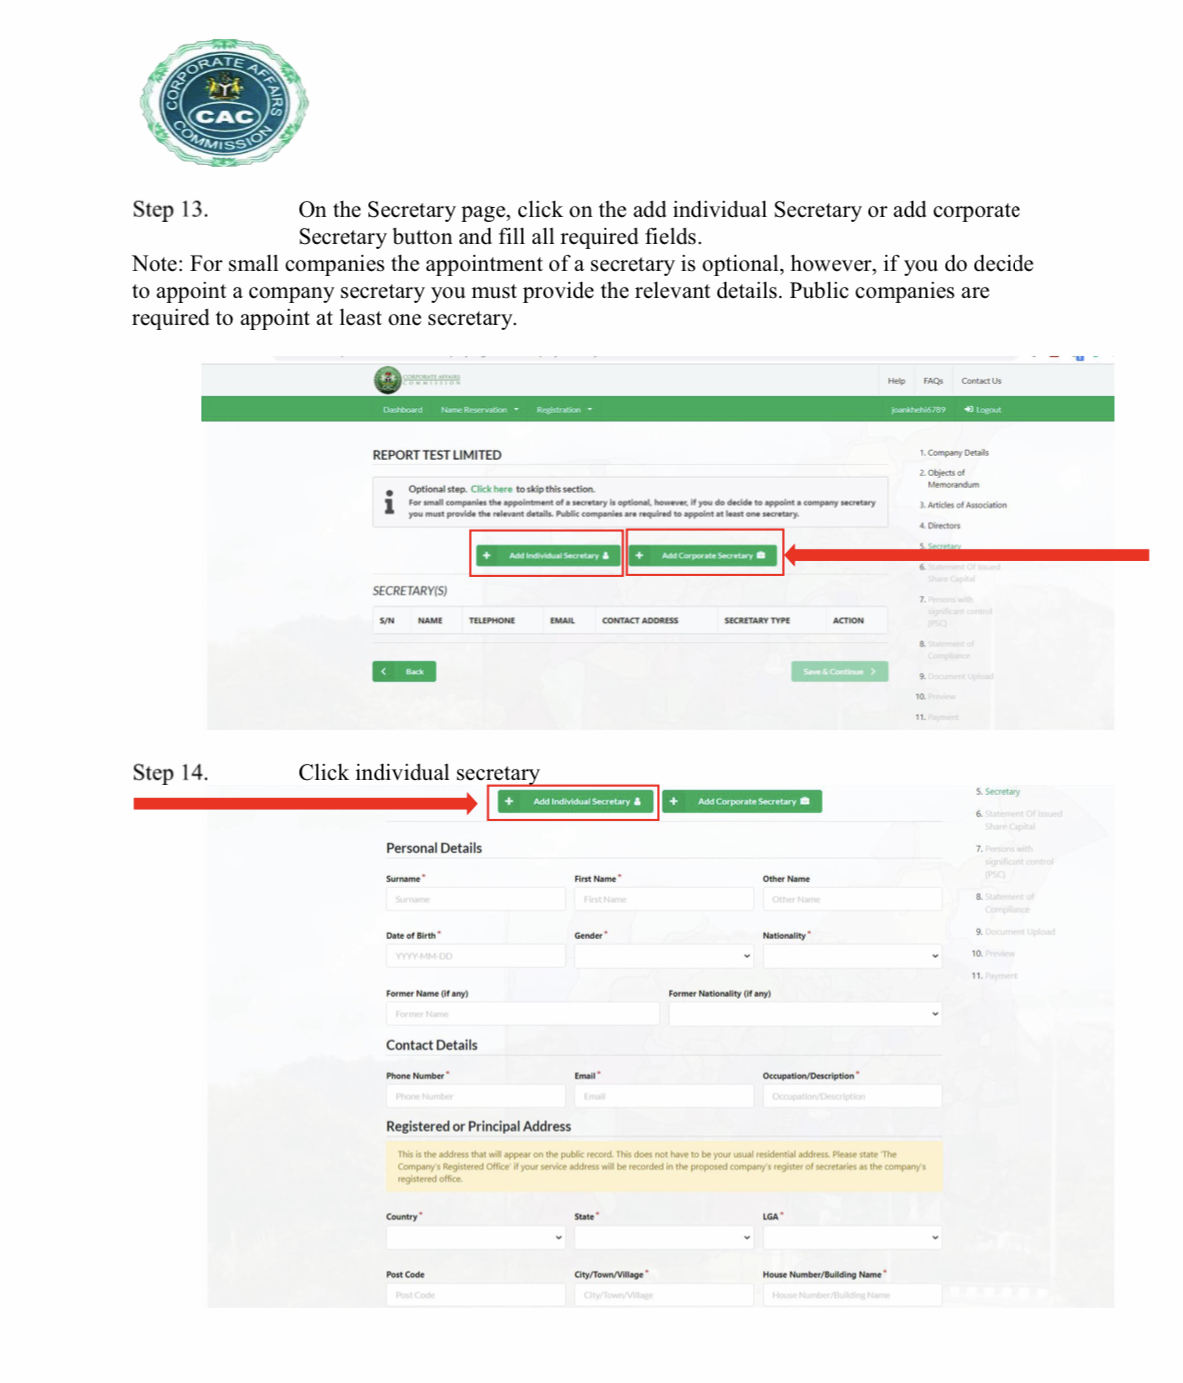
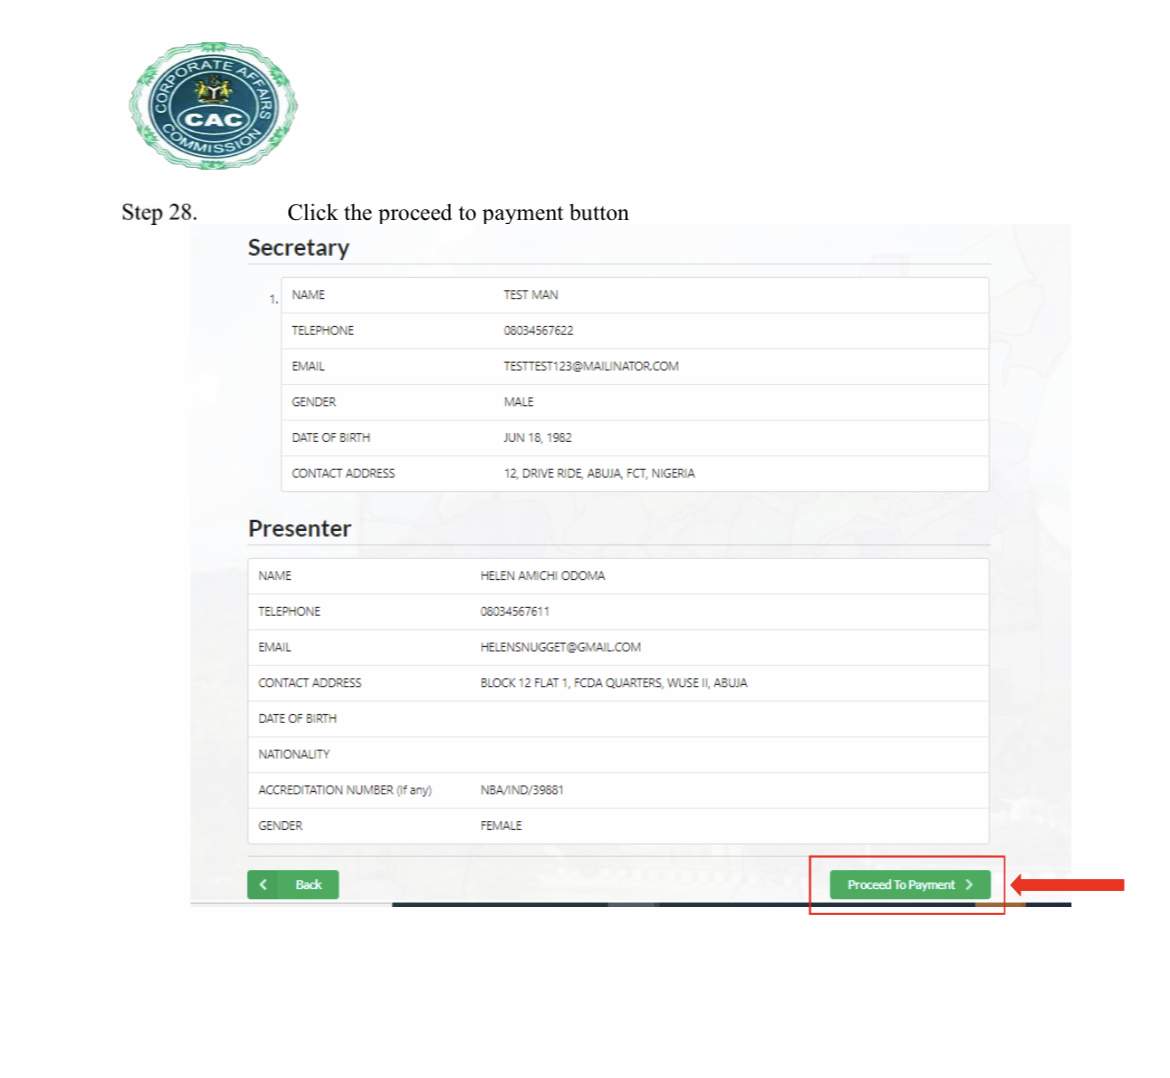
As a private company limited by shares, you have the choice to appoint a secretary for your company as you may also decide not having any. It is not compulsory to have a secretary. If you decide not having any, kindly click on “skip” to skip this page.
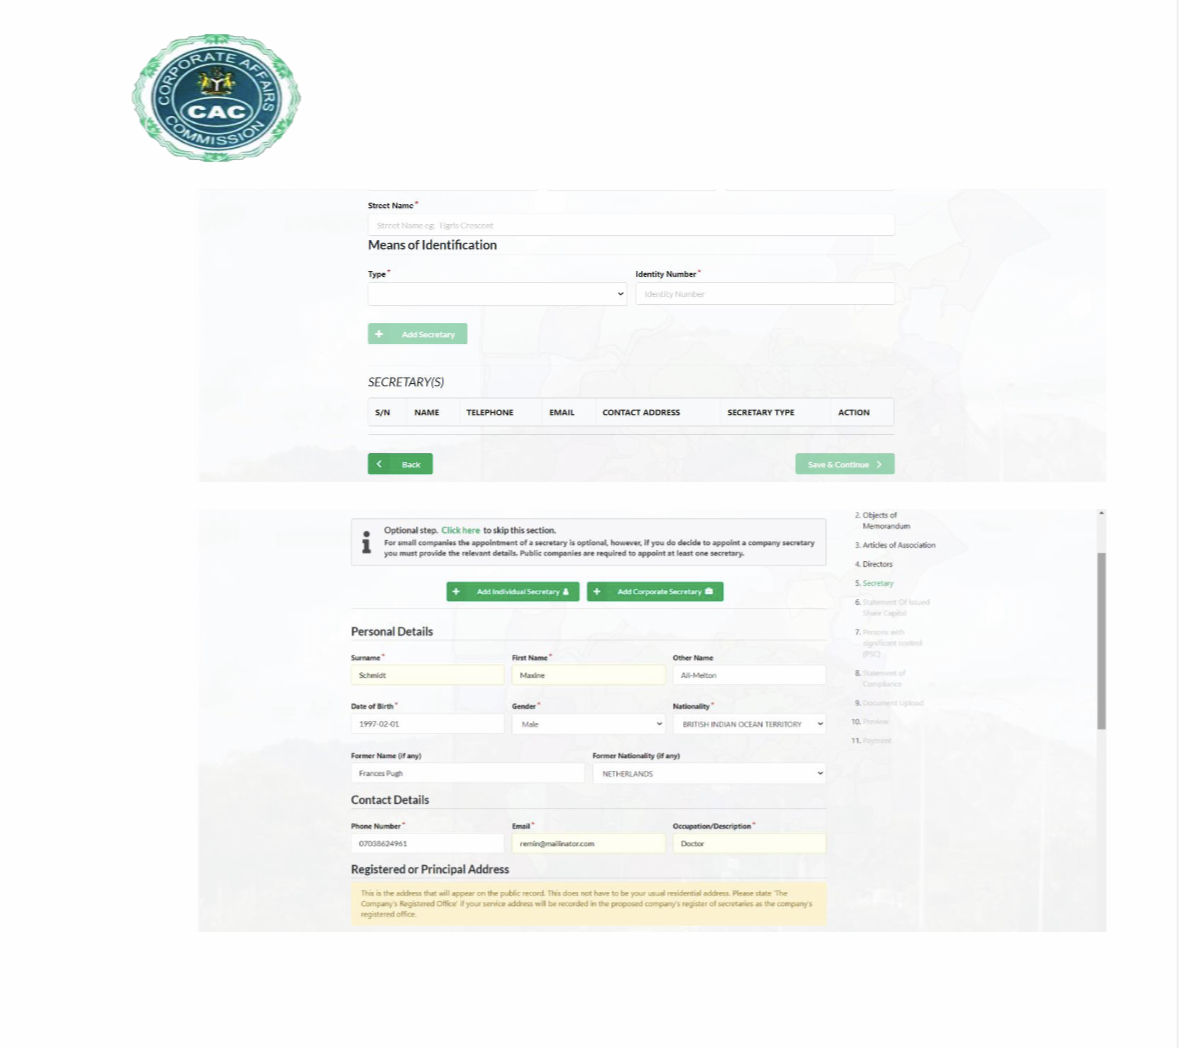
However if you decide to have a secretary, you have two (2) options here. Your secretary can be an “individual secretary” as it can also be a ” corporate secretary“. The type of secretary most small private company limited by shares choose is “individual secretary“. This been said, if you want to add individual as secretary, click on “Add Individual secretary” and provide all necessary information. But if your secretary is an organization, click on ” Add Corporate secretary” and fill all required fields.
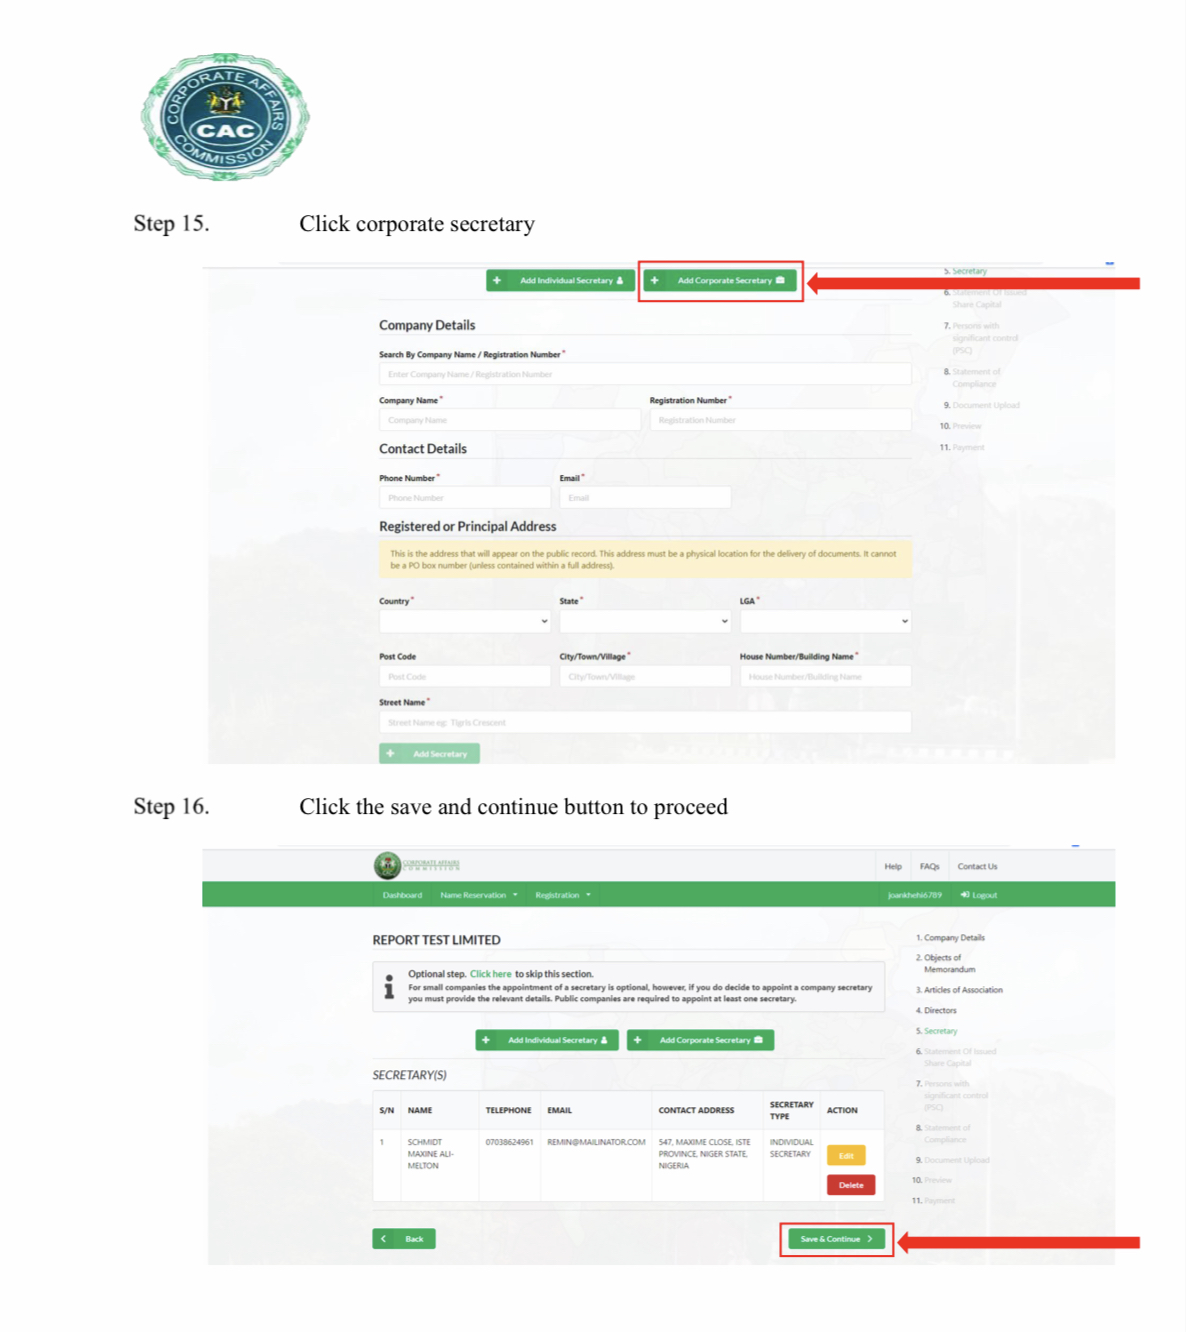
Editing or deleting secretary information if necessary
You can edit your secretary’s information by clicking on “Edit” if you realize that there is a mistake. After finish editing, click on “Save & Continue“. For one reason or another, you can also delete any secretary from your list of secretaries by clicking on “delete” But all these need to be done before you pay for your company registration. After providing and filling the secretary’s information, click on “save & continue” to continue with your CAC registration as indicated on the screenshots below.
VII- STATEMENT OF ISSUED SHARE CAPITAL
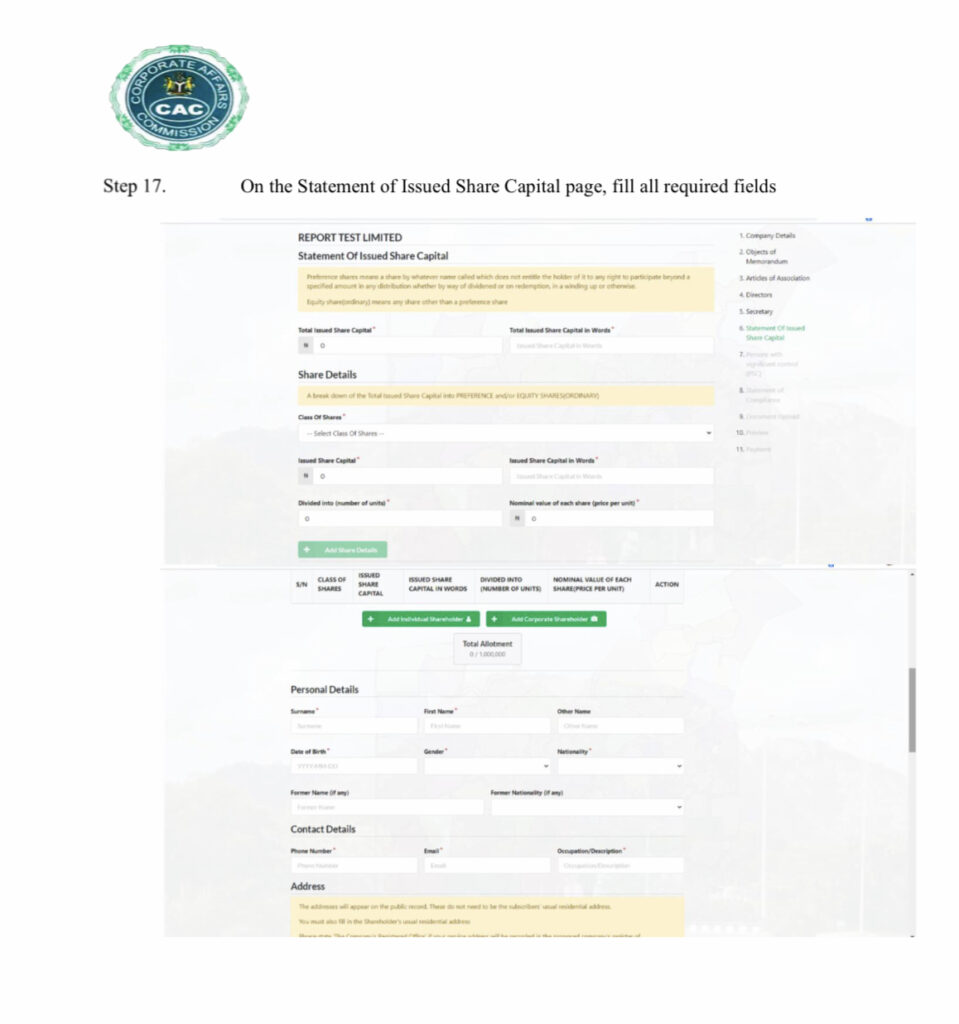
The minimum share capital for a private company limited by share is one (1) million Naira. But there are some businesses that require more than one (1) million as minimum capital. Those businesses are “oil & Gas“, “real estate“, “importation of cars“, etc…. If you are into one of those businesses, your minimum share capital should be more than one (1) million. Secondly keep in mind that higher your share capital, higher the CAC registration fees. Now let’s learn how to fill this page properly.
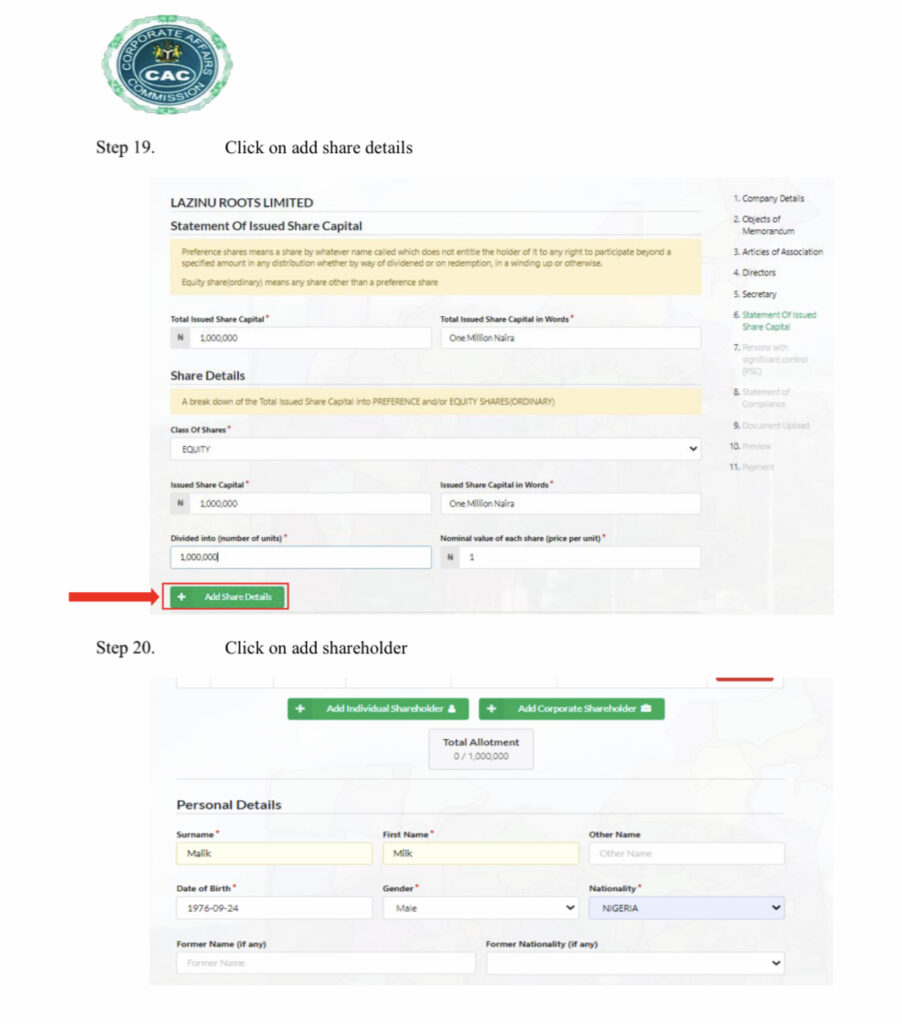
1- Share Details
- Total Issued Share Capital: On this field you need to mention the total share capital in figure and in words as well
- Class of shares: Here you need to specify the type of shares. For instance, if your a part or the total share capital is pecuniary, choose “Ordinary“.
- Issued Share Capital: What you need to do here is to repeat the total share capital in figure and words
- Divided into ( Number of units) : Here you need to write the total share in units. For instance, if the total share capital is one million, the number of shares could be hundred thousands (100,000). In that case the Nominal value of each share (price per unit) will be 10 meaning 1,000,000 divided by 100,000 (1,000,000/100,000 = 10). If for instance the number of shares is 500,000 units with a total share capital of un million, the nominal value of each share (price per unit) will be 2 meaning 1,000,000 divided by 500,000 (1,000,000/100,000 = 2)
So, after filling all the above information, click on “Add Share Details“. If you have another type of shares different from the first one, repeat the process again and add them. But if you don’t have any other types of shares, then continue by providing the shareholders details
2- Shareholders Details
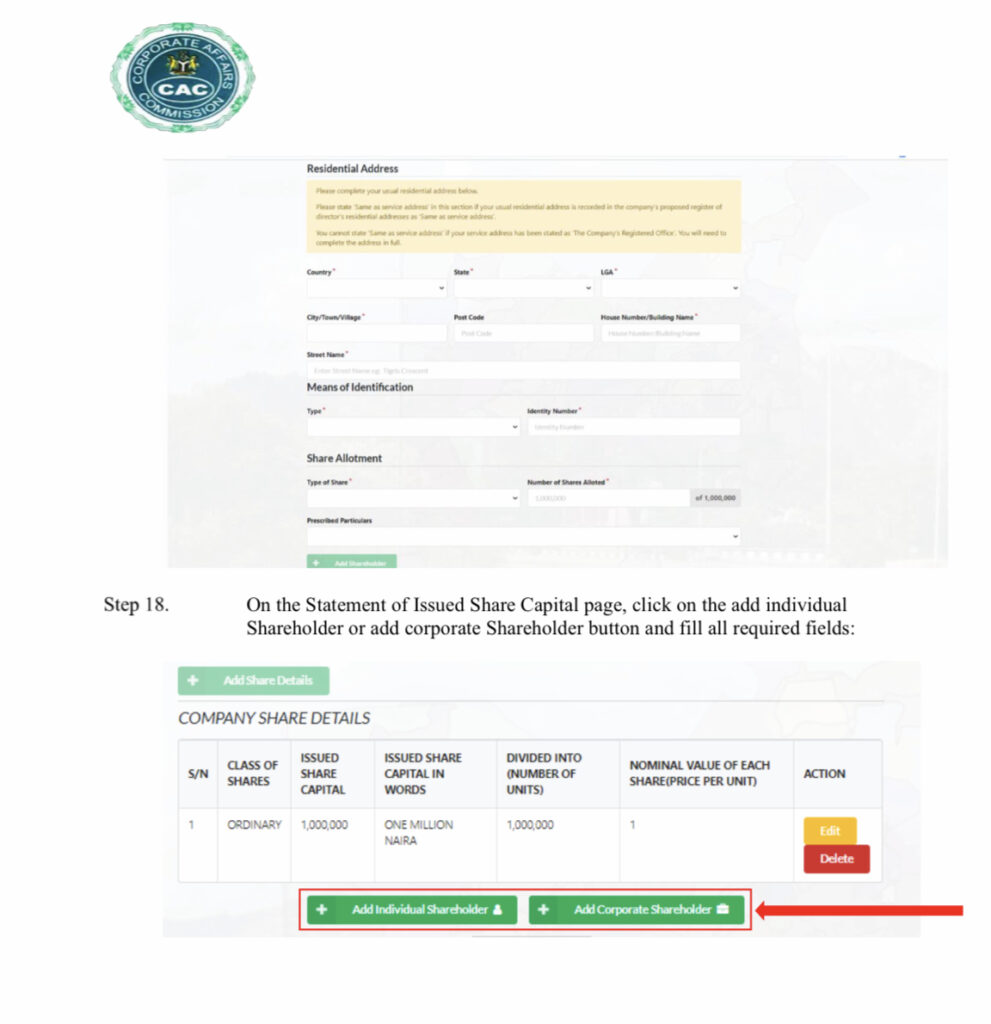
What you need to do here is to provide some information such as “Personal Details“, “Contact Details“, “Residential Address“, and “Means of Identification details” about each shareholder. After that, you need to specify the total share capital that is attributed to each as well as the number of shares each of them hold.
Keep in mind that the company must have at least 2 shareholders. Shareholders are people that own the company. So even if you are the one that has 100% of the capital share, you can attribute some shares to one of your children or to your spouse just to fulfilled the law requirement.
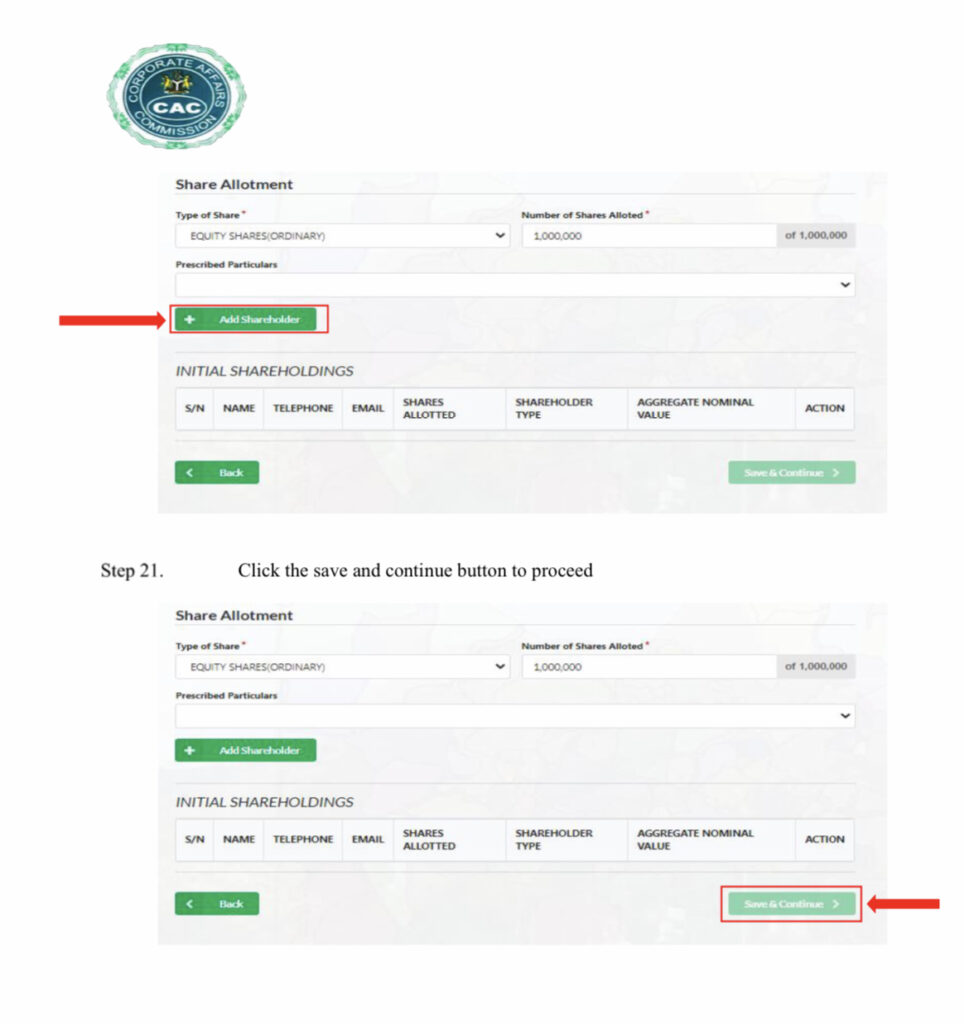
After filling all required field about your first shareholder, click on ” Add Shareholder“, and then repeat the process again and again by clicking on ” Add individual shareholder” or “Add Corporate shareholder” until you finish adding all your shareholders one after another.
IMPORTANT NOTE
One thing to also keep in mind is that “individual shareholder” refers to an individual person while “Corporate shareholder” refers to an organization or company. So this means you can have as shareholders, an individual person or another company or both. For more clarification, take a look on the pictures below.
When you are done adding all your shareholders, kindly click one “Save & Continue” to continue with your CAC registration.
VIII-PERSONS WITH SIGNIFICANT CONTROL
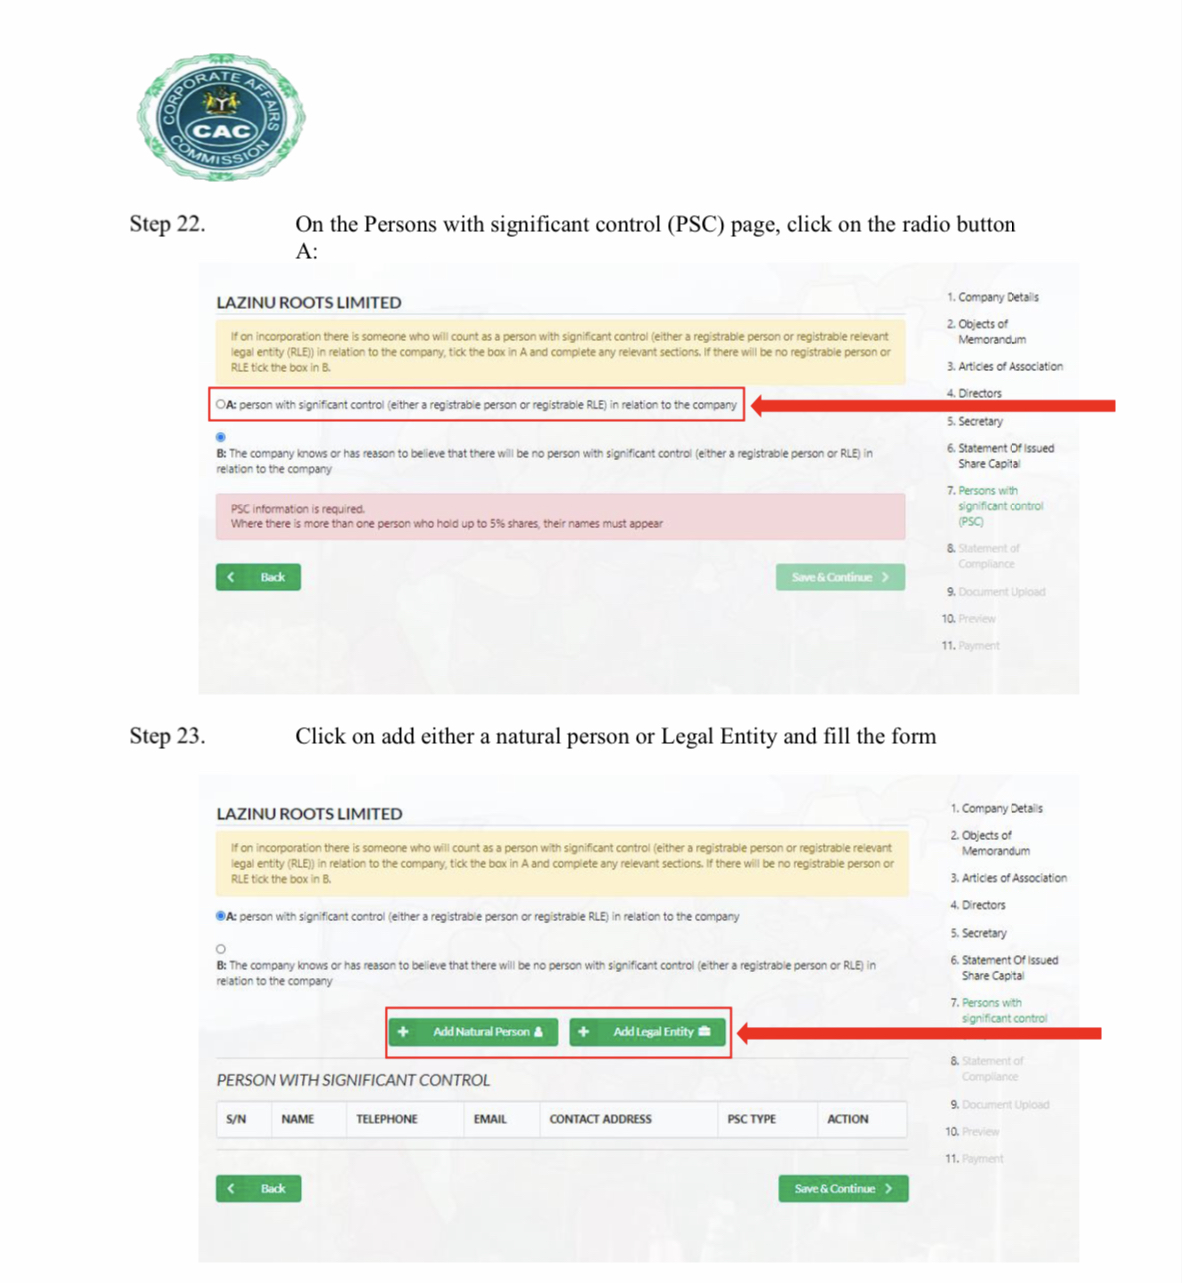
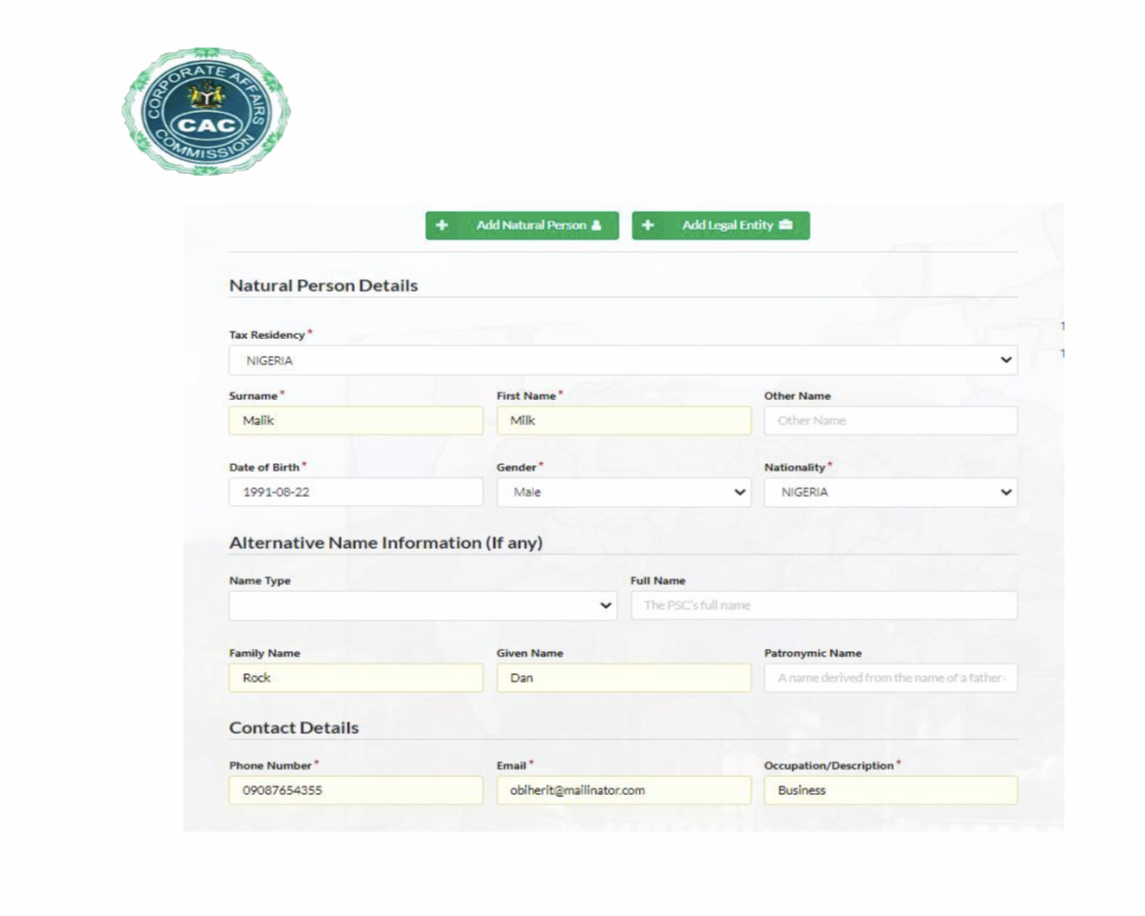
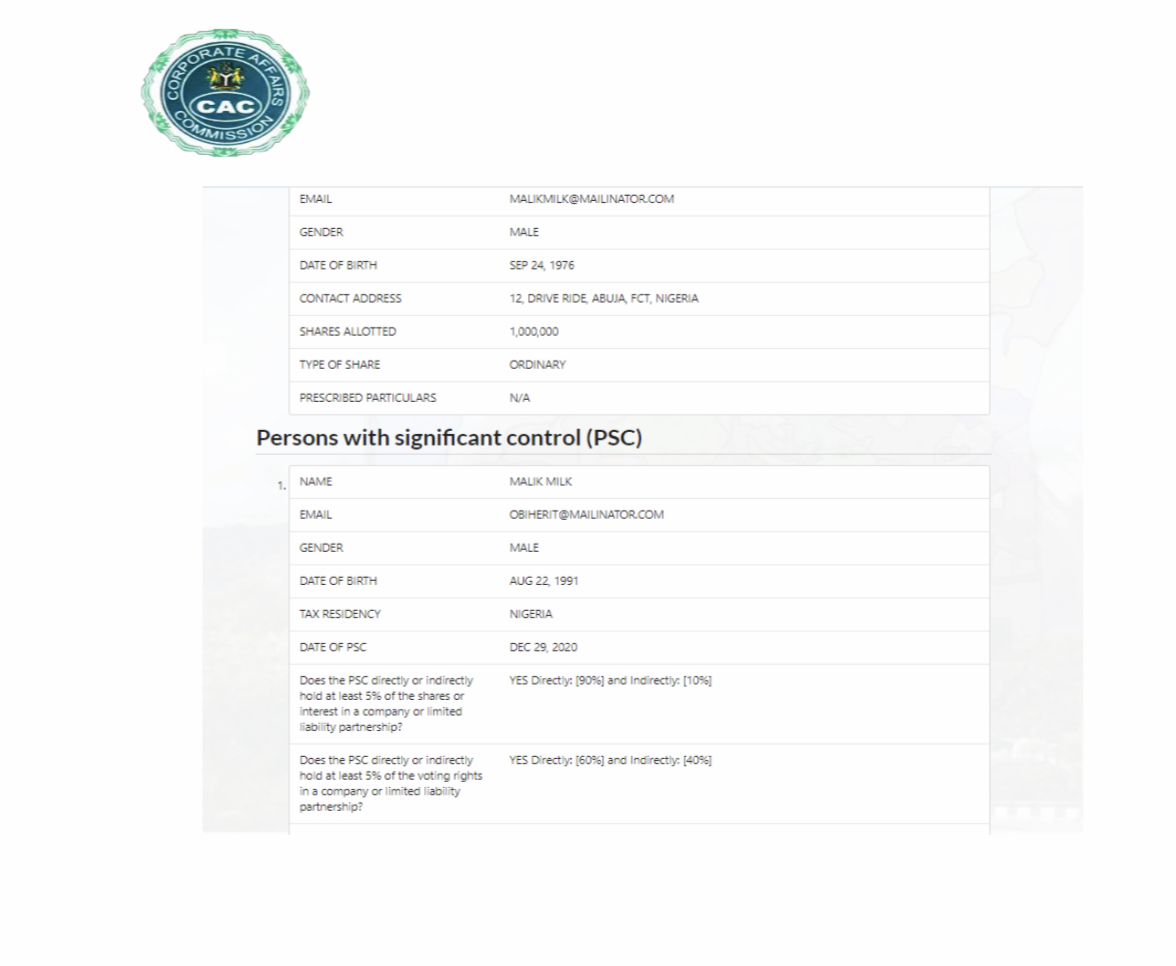
On this page, you need to choose either or not there are some persons that have significant control over the company. If there are some, tick on option “A” and then click on “Save & Continue“, but if there is none, tick on option “B”. Note that the PSC (Persons with Significant Control) can be an “individual” as it can be a “Corporate” or both.
So if you choose option “A”, proceed by clicking on “Save & Continue“. On the next page, choose ” Add nature person” if the PSC is an individual or choose ” Add legal entity” if the the PSC is a registered business or company.
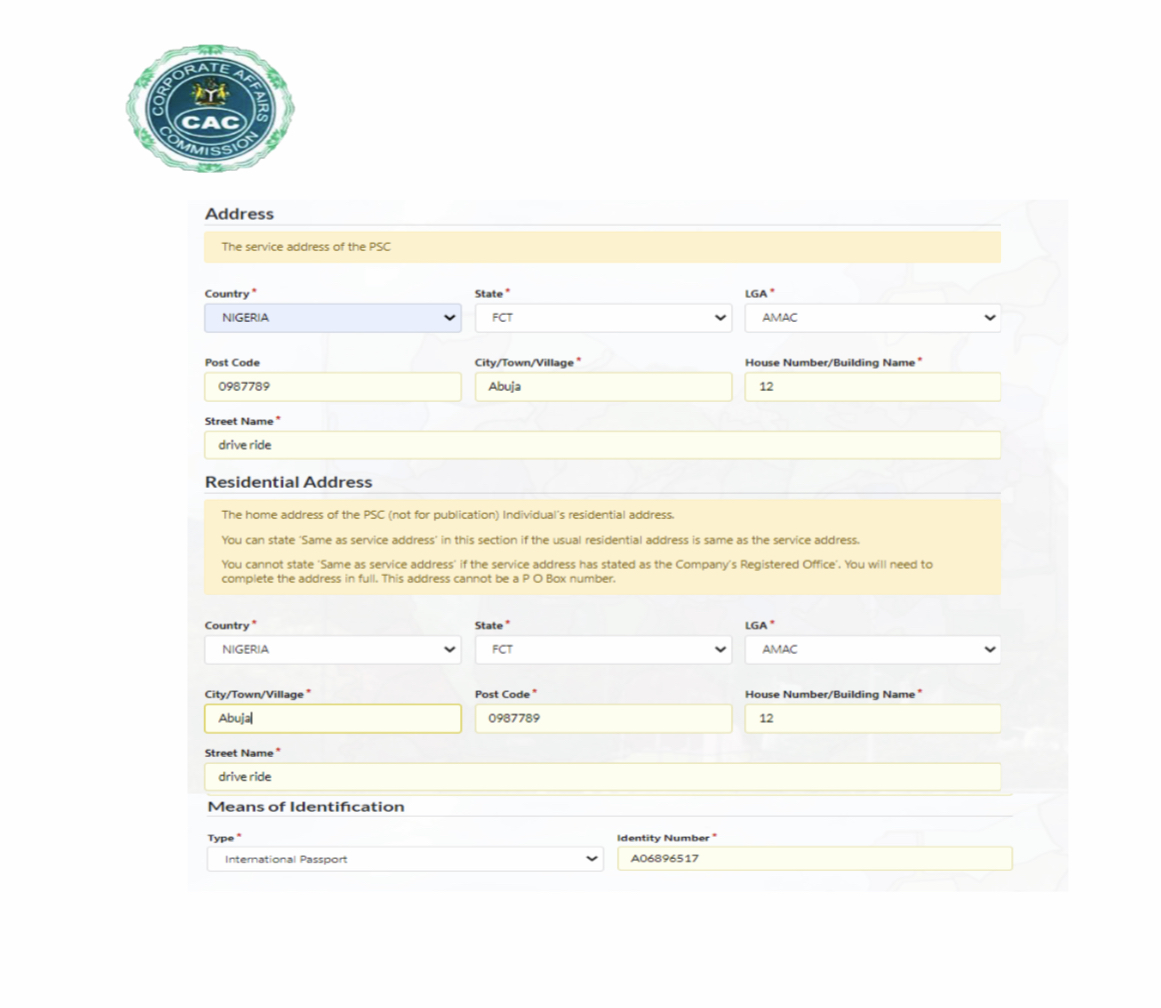
After clicking on the type of PSC, fill all required information such as ” Personal Details“, “Contact Details“, “Residential Address“, and “Means of Identification Details“. Then click on “Save & Continue” and repeat the process if you have more than one PSC until you finish adding all. See pictures below for better understanding
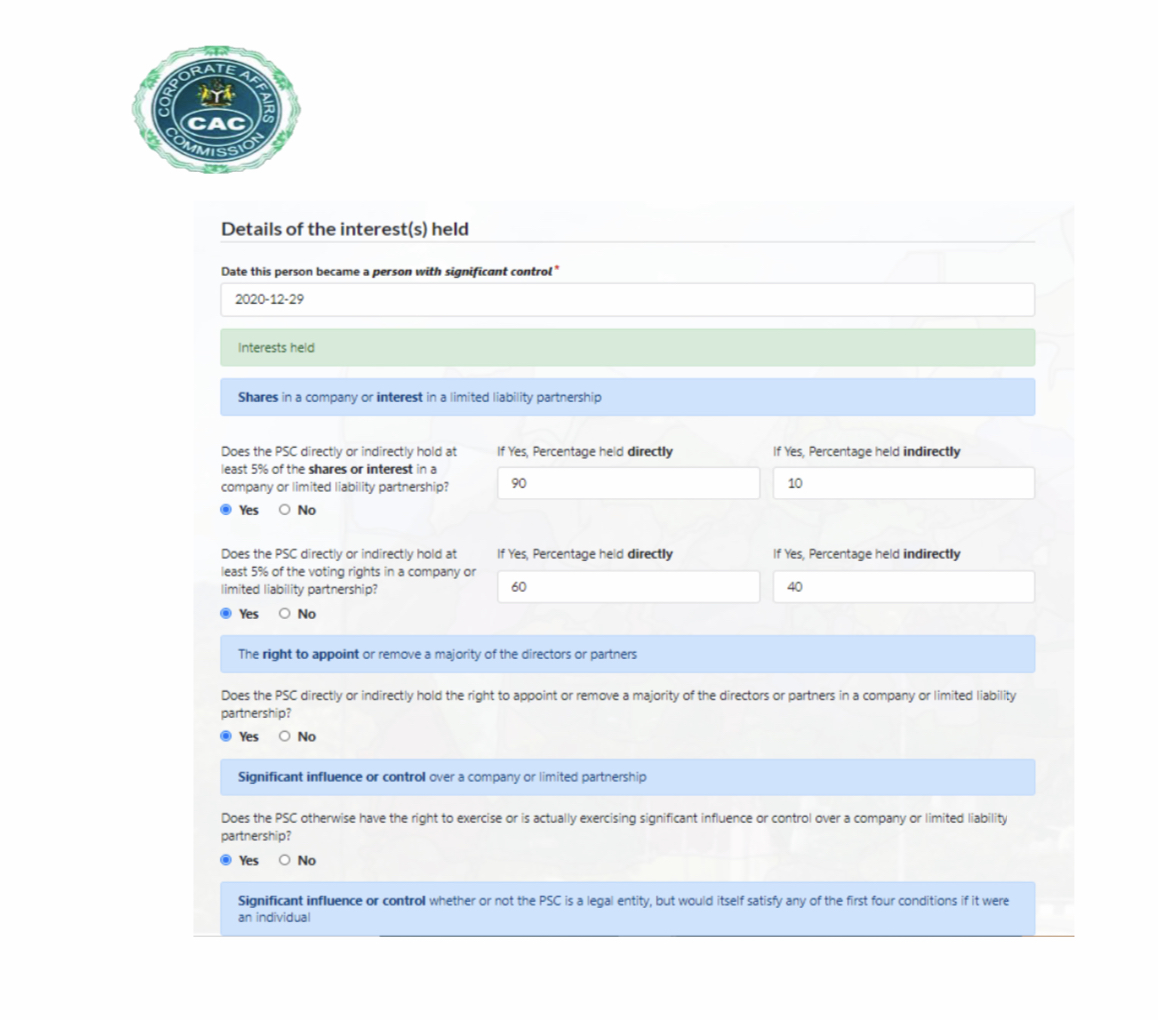
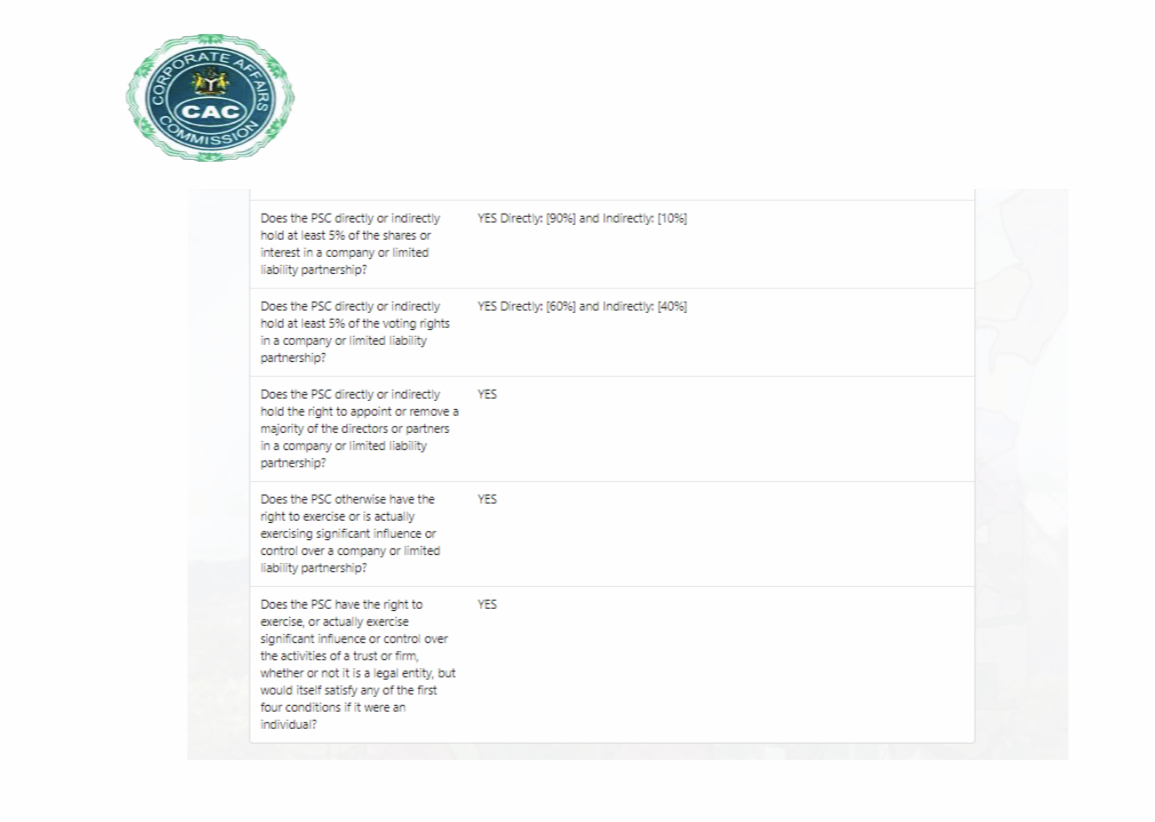
After clicking on “Save & Continue” you will land to another page where you will need to answer some basic information by “YES” or “NO“. See the picture below.
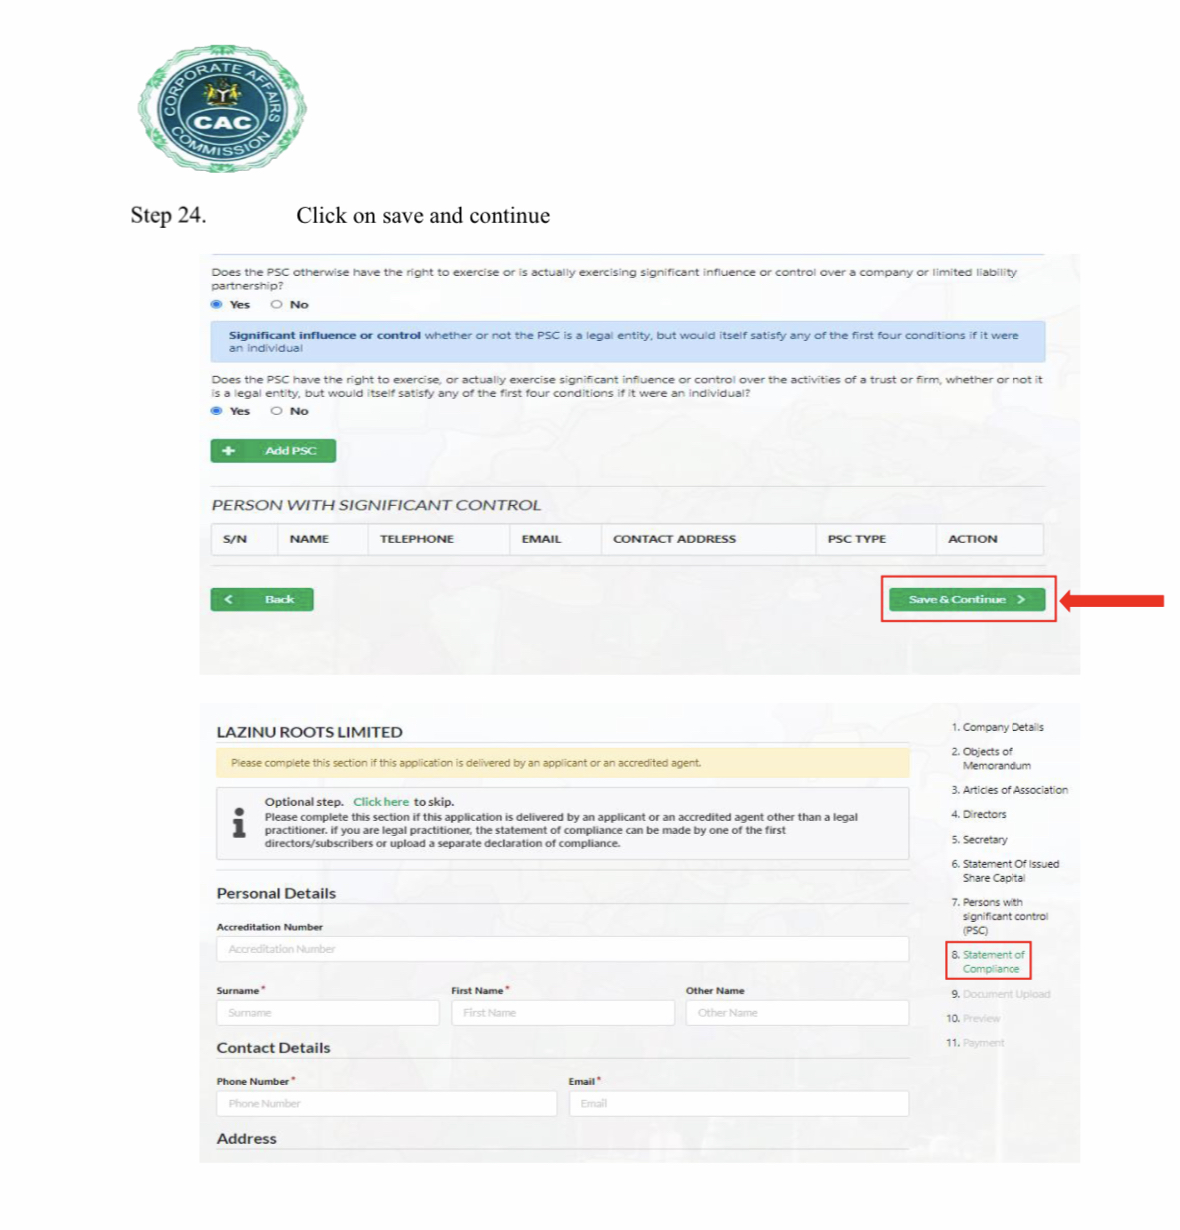
After answering the previous questions, click on “Save & Continue“. On the next page, click on “skip” as you are doing the CAC registration by yourself and for your business.
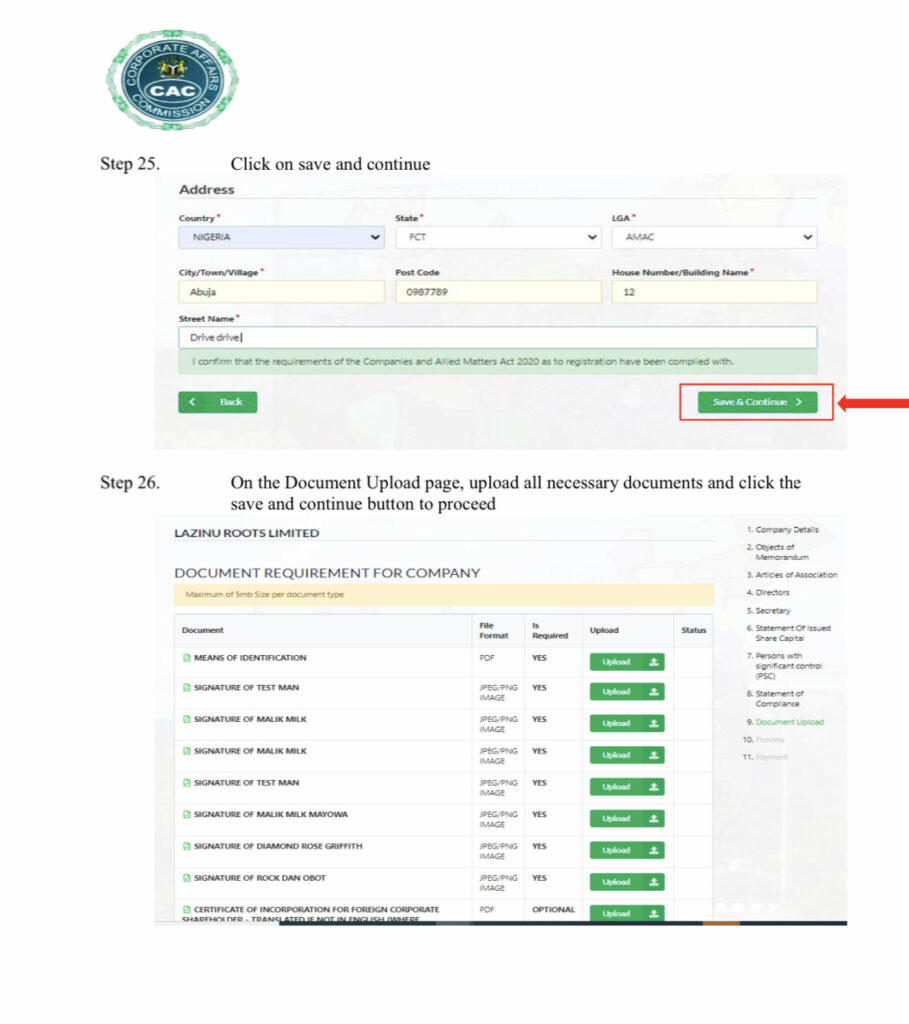
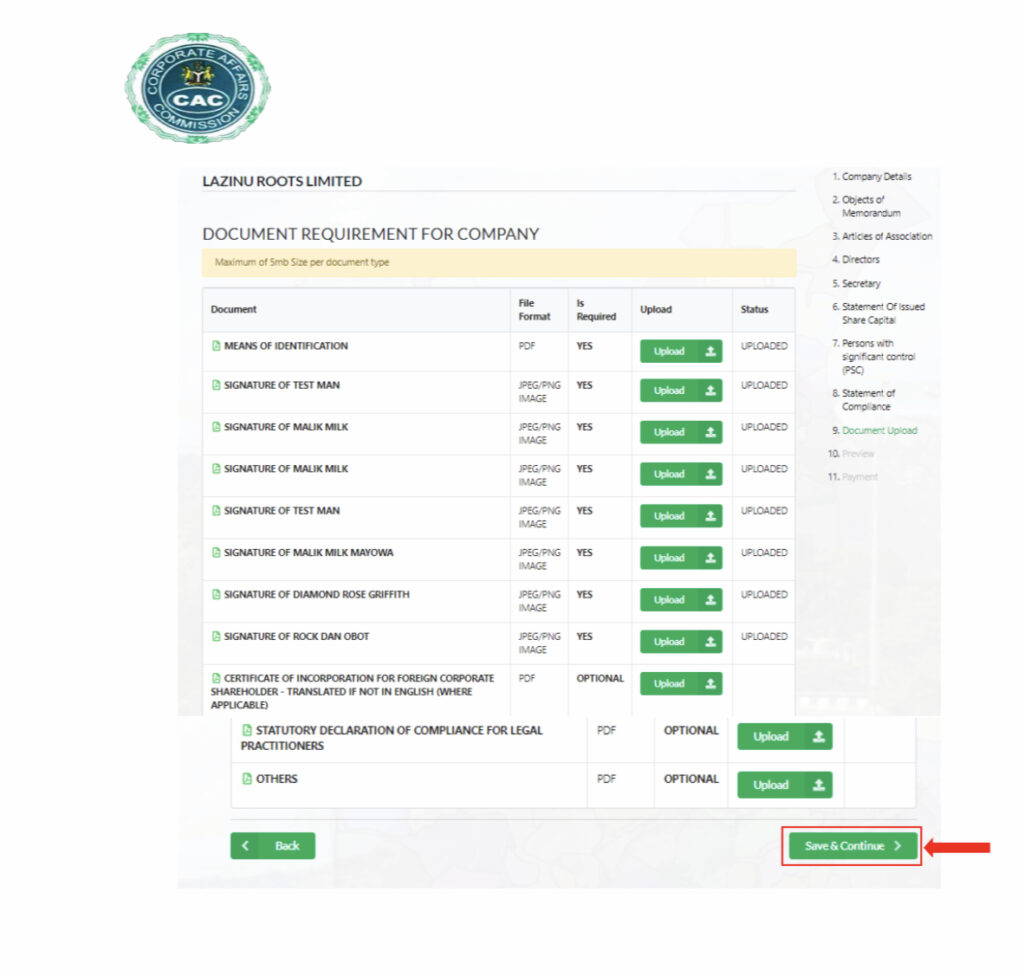
IX- DOCUMENTS TO UPLOAD FOR THE CAC REGISTRATION
On this page, you need to upload the following documents:
- Means of Identification of all the shareholders, directors, secretary and witness. Those means of identification should be first converted to PDF if not the uploading will fail.
- Signatures of all shareholders, directors, secretary and witness. What each of the persons involved need to do is to sign on a piece of paper, snap it. then you upload them one by one.
- Passport photograph of all the directors, Shareholders, witness and secretary if there is any.
After uploading all documents, click on “Save & Continue” to continue your CAC registration for a private company limited by shares. The pictures below best demonstrate what I’m saying. So take a look
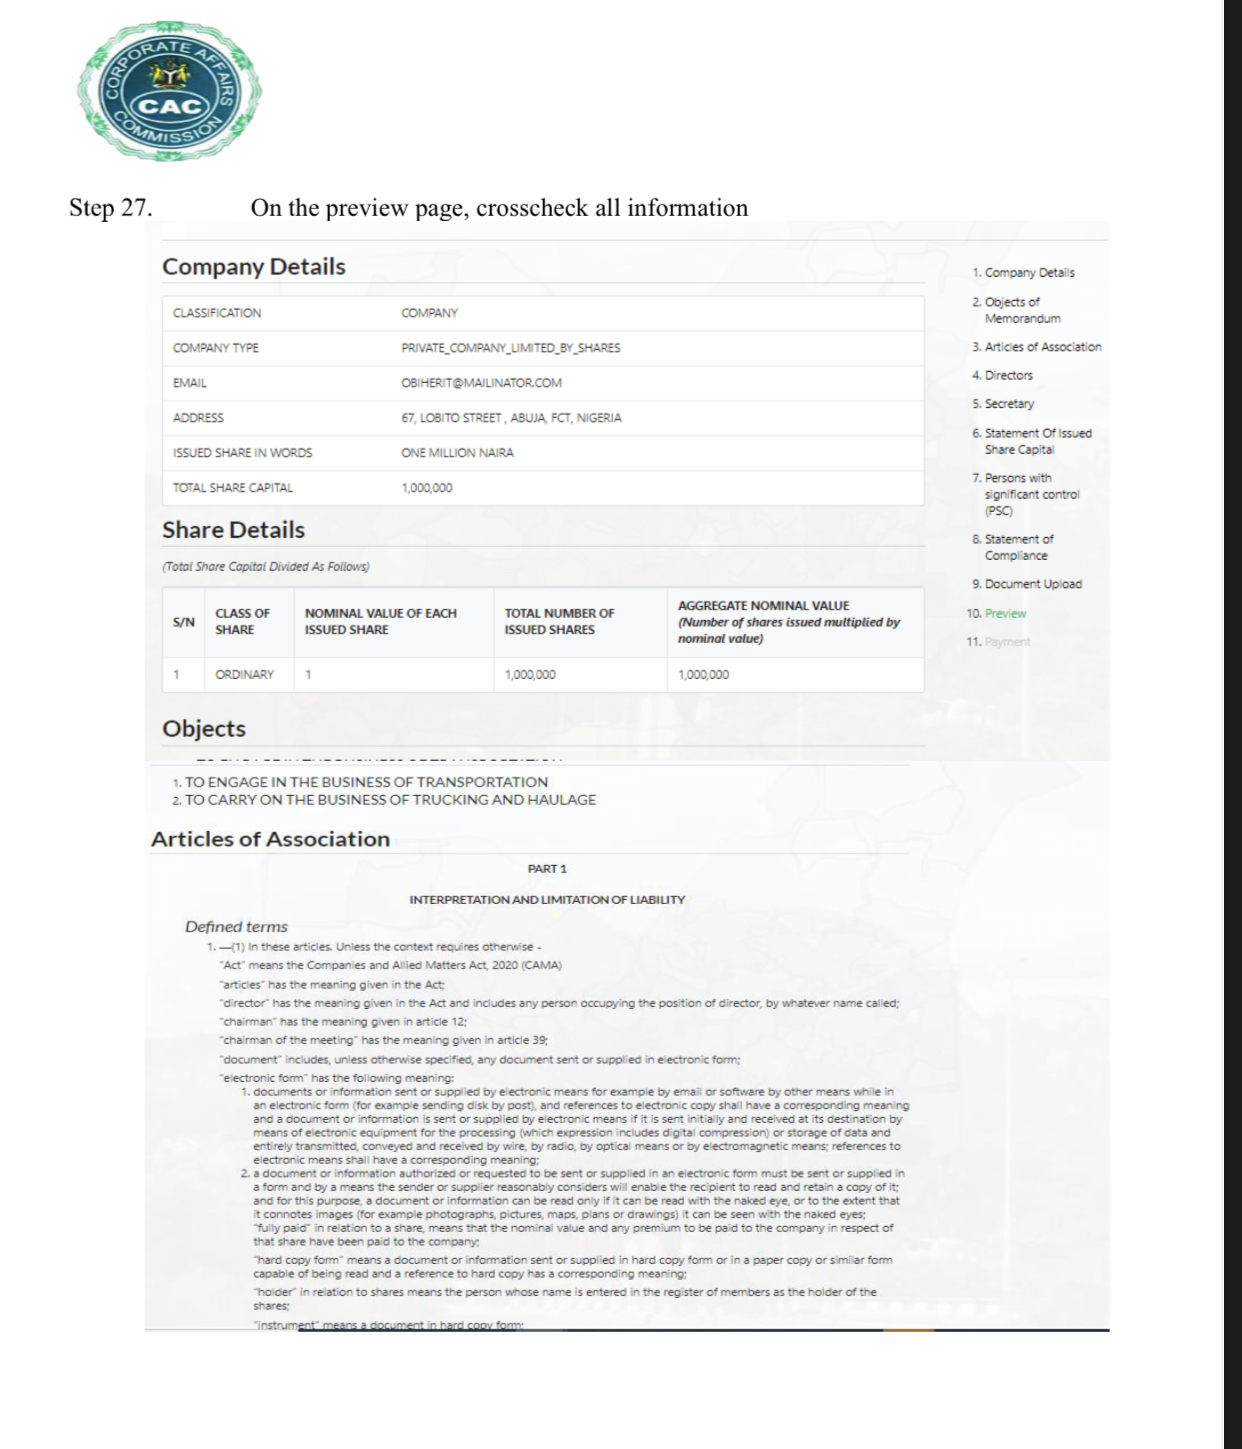
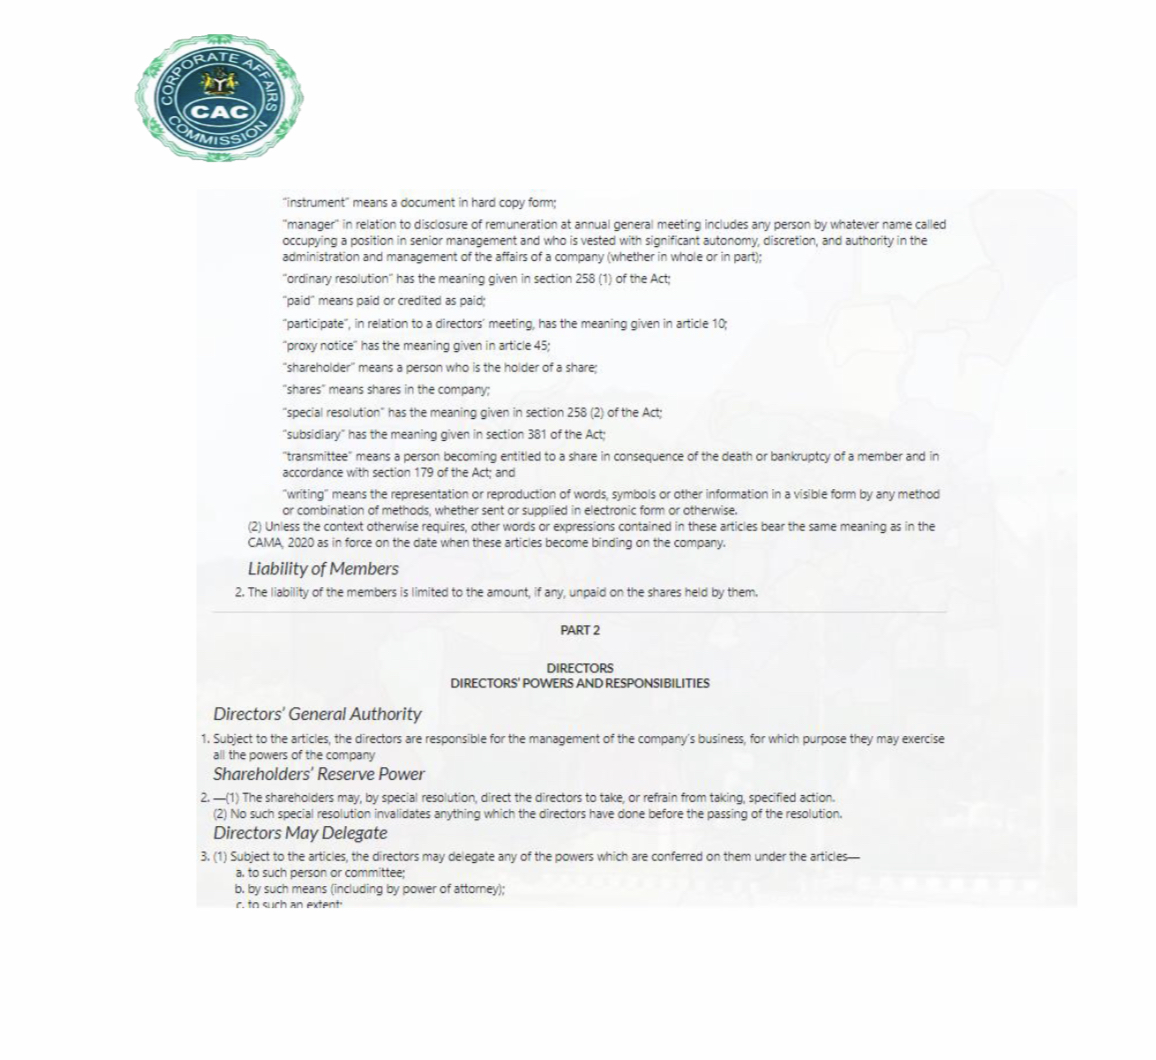
X- PREVIEW ALL INFORMATION
All you have to do here is to cross-check all information you have provided from the beginning till the previous one. Below are the previous pages. Take a look to see what they look like.
While cross- checking if you see any mistake, go back and rectify it. But if all information are correct and you are satisfied with them, click on “Save & Continue“. The next page you will lead to is payment page.
5th & FINAL STEP FOR CAC REGISTRATION: PAYMENT
1- REGISTRATION FEE PAYMENT
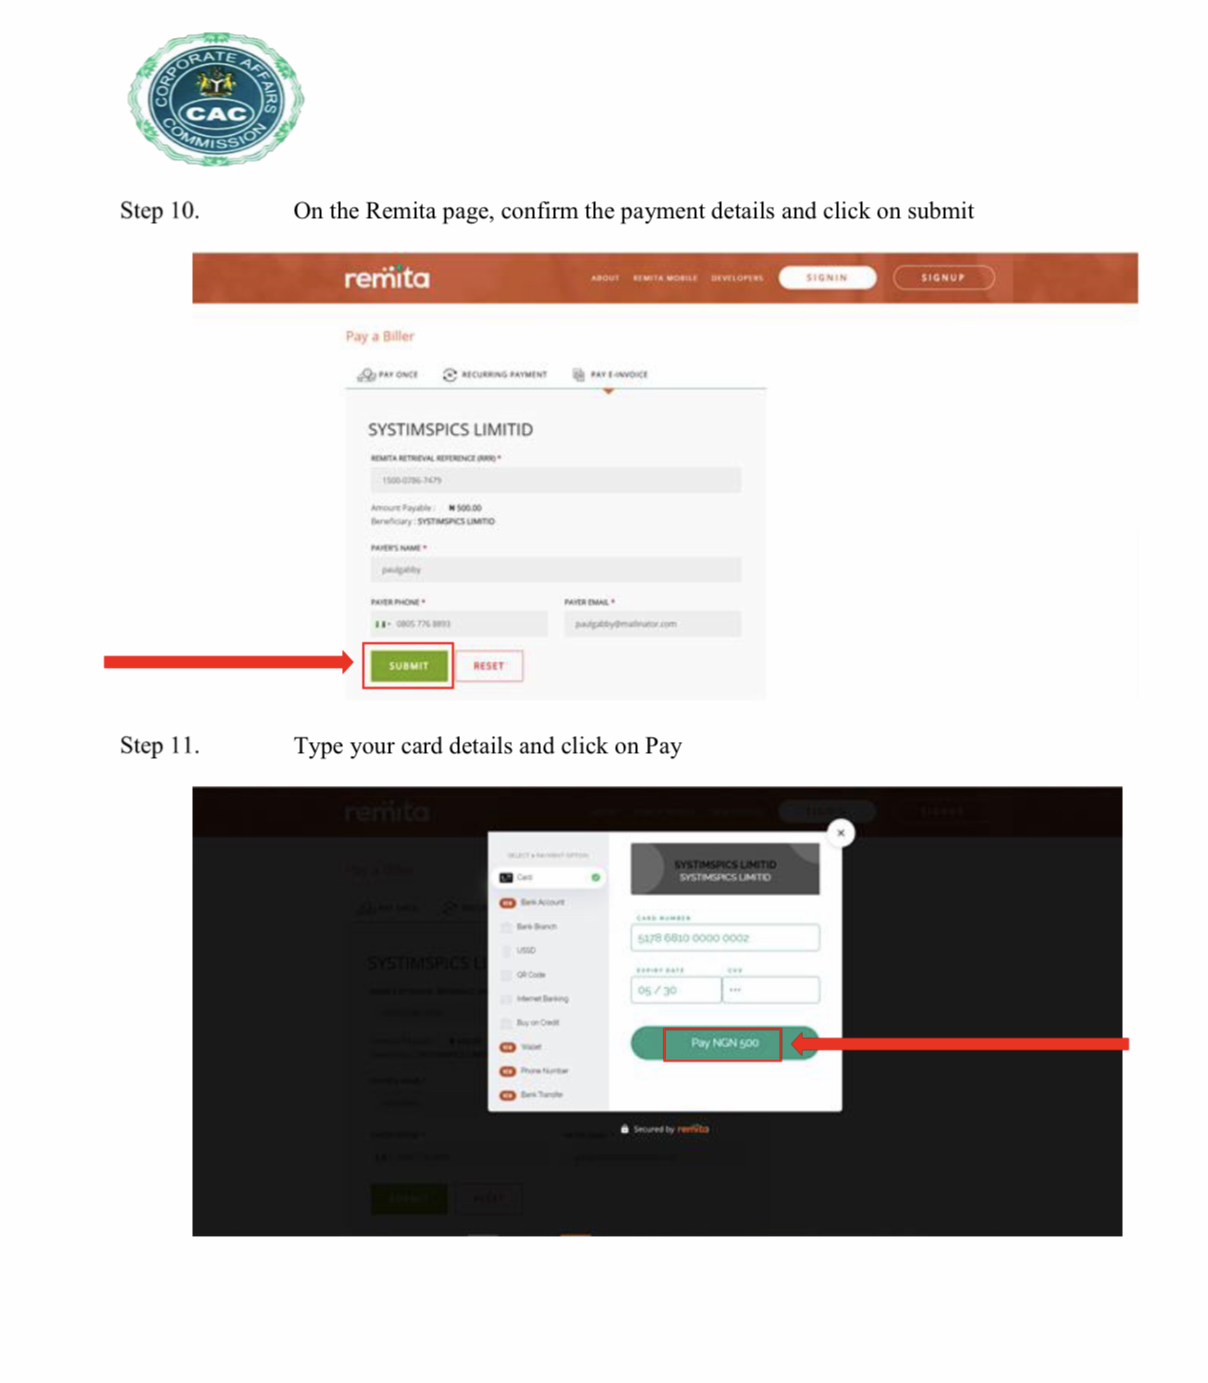
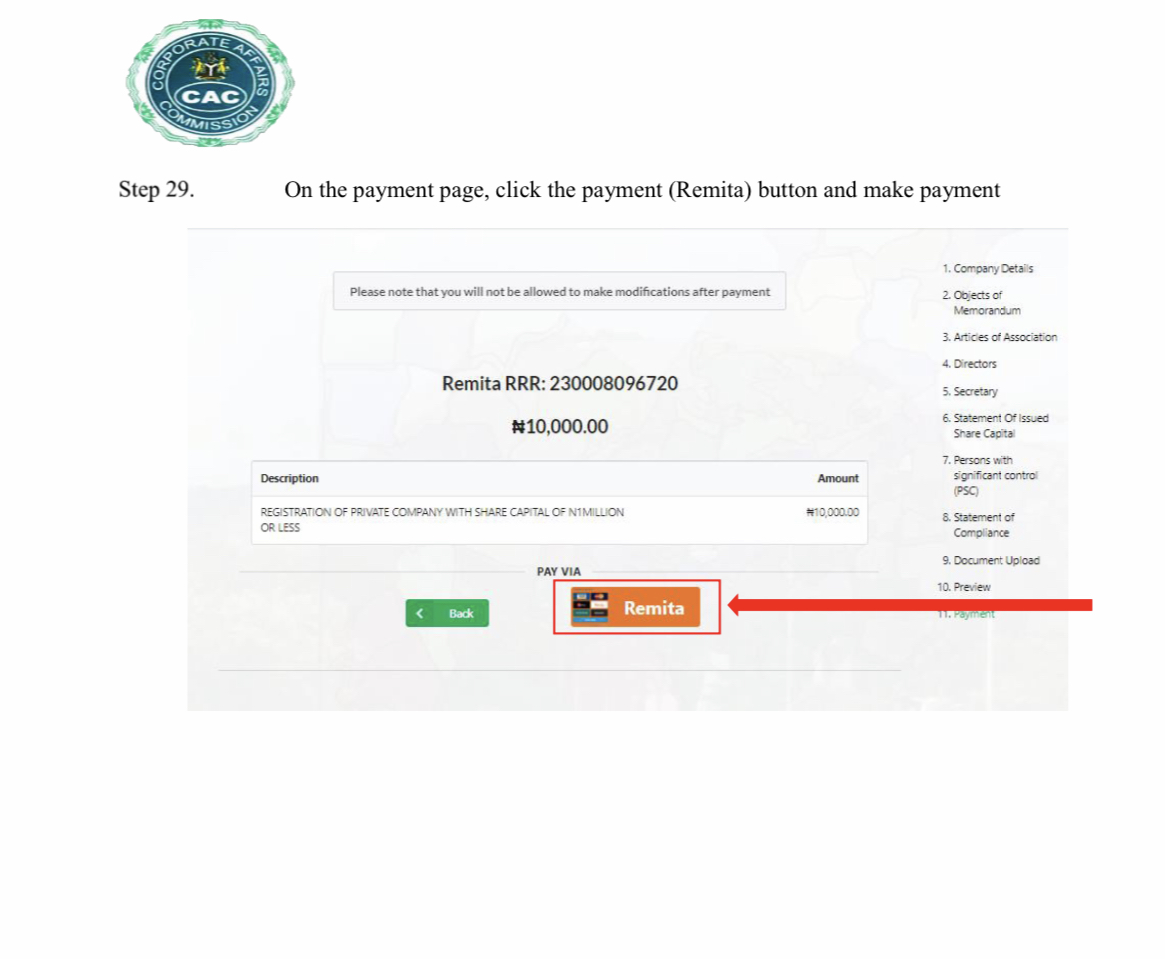
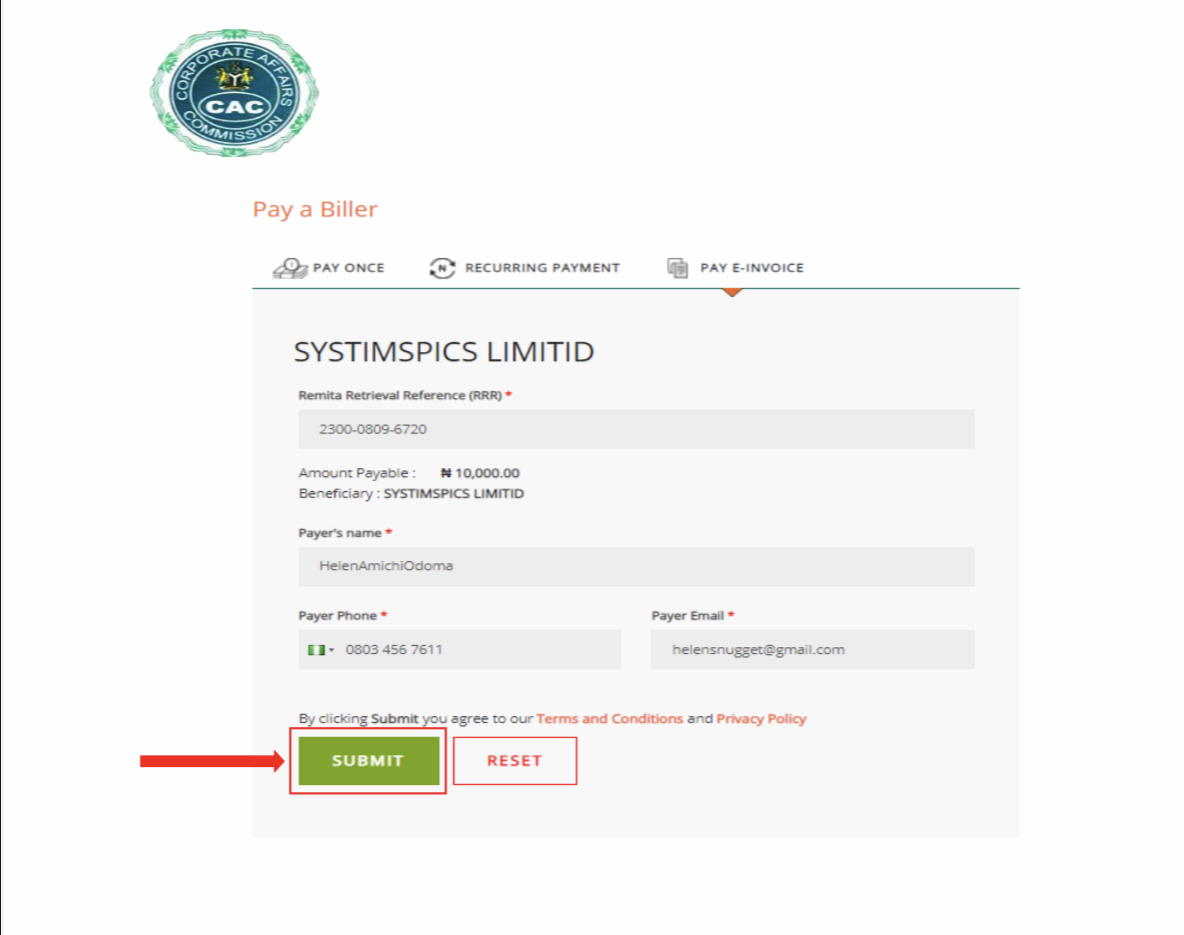
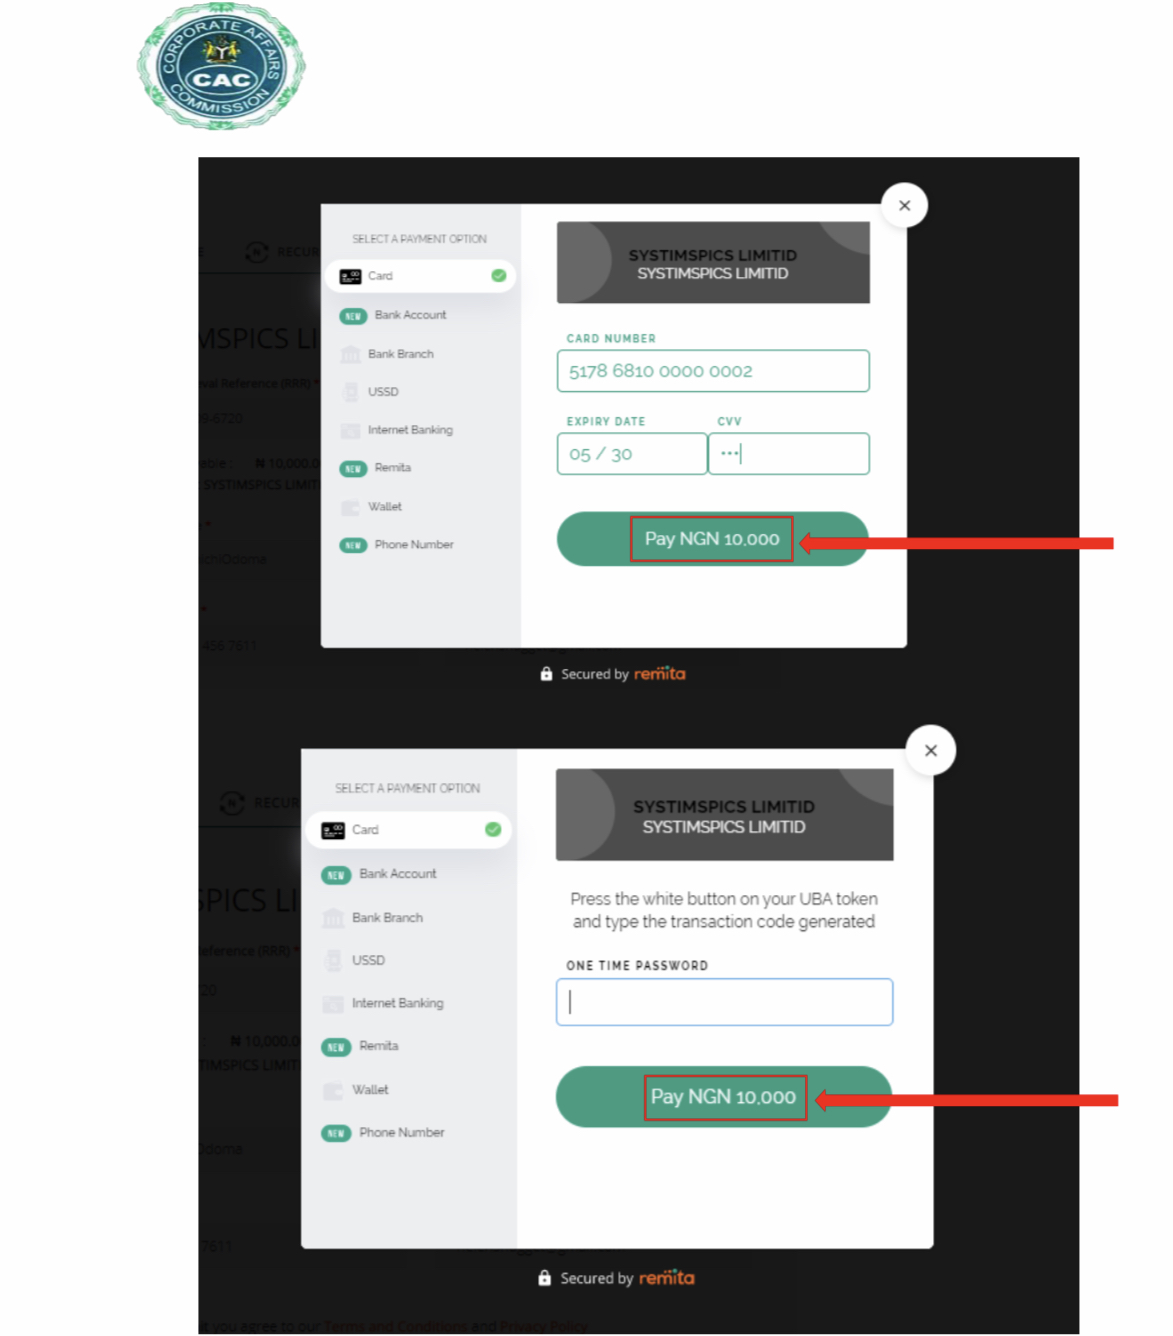
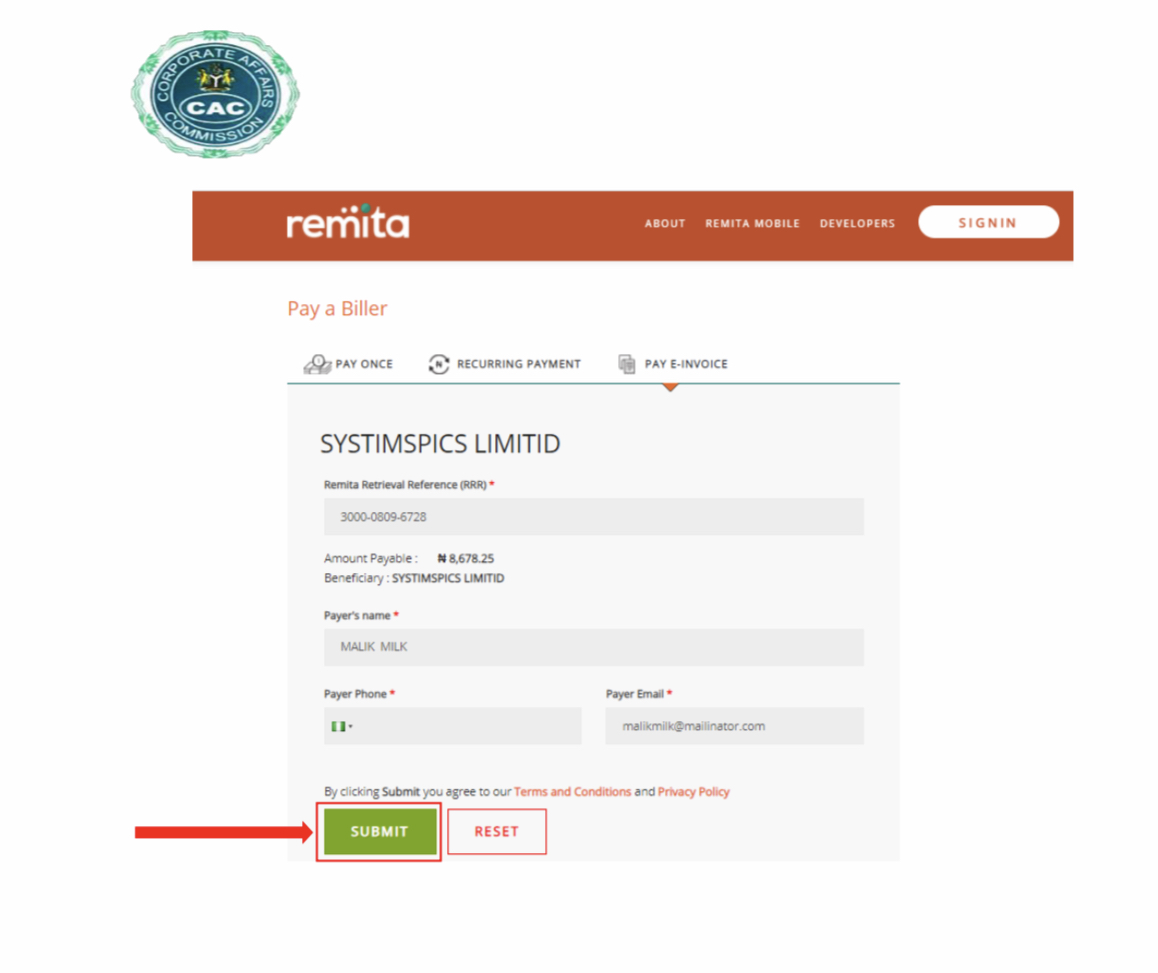
The first payment to make is the registration fee payment. So on this page, click on “Remita“. On the second page that will show up, check if the information provided are properly related to the business. If yes, click on “submit“. On the third (3rd) page, you need to choose your mode of payment. Here you have many options like “Card“, “Bank Account“, “Bank Branch“, “USSD“, “Internet Banking“, “Remita“, “Wallet“, “Phone Number“.
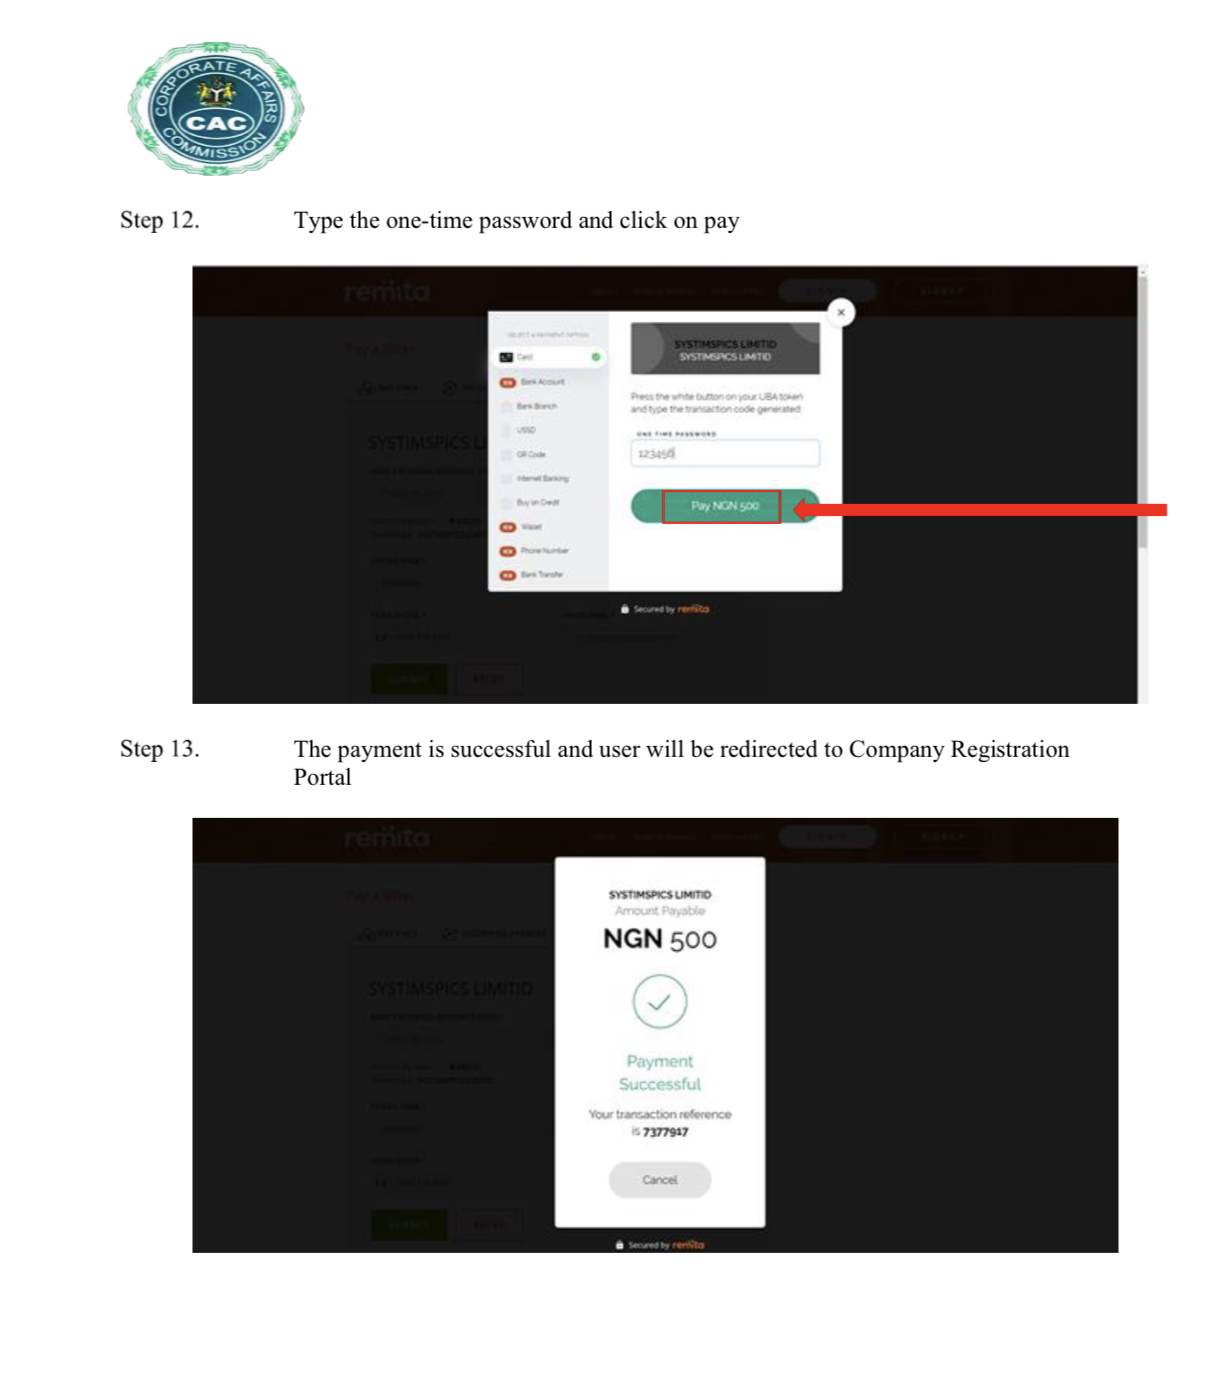
So choose the mode of payment that is convenient for you. Most people choose the “Card” option. if that is what you also choose, then you need to provide your card details and clock on “Pay NGN 10,000“. After that, you will receive an OTP on your Phone number. Input the OTP on the next page to confirm your transaction. See the procedure on pictures below.
II- STAMP DUTY PAYMENT
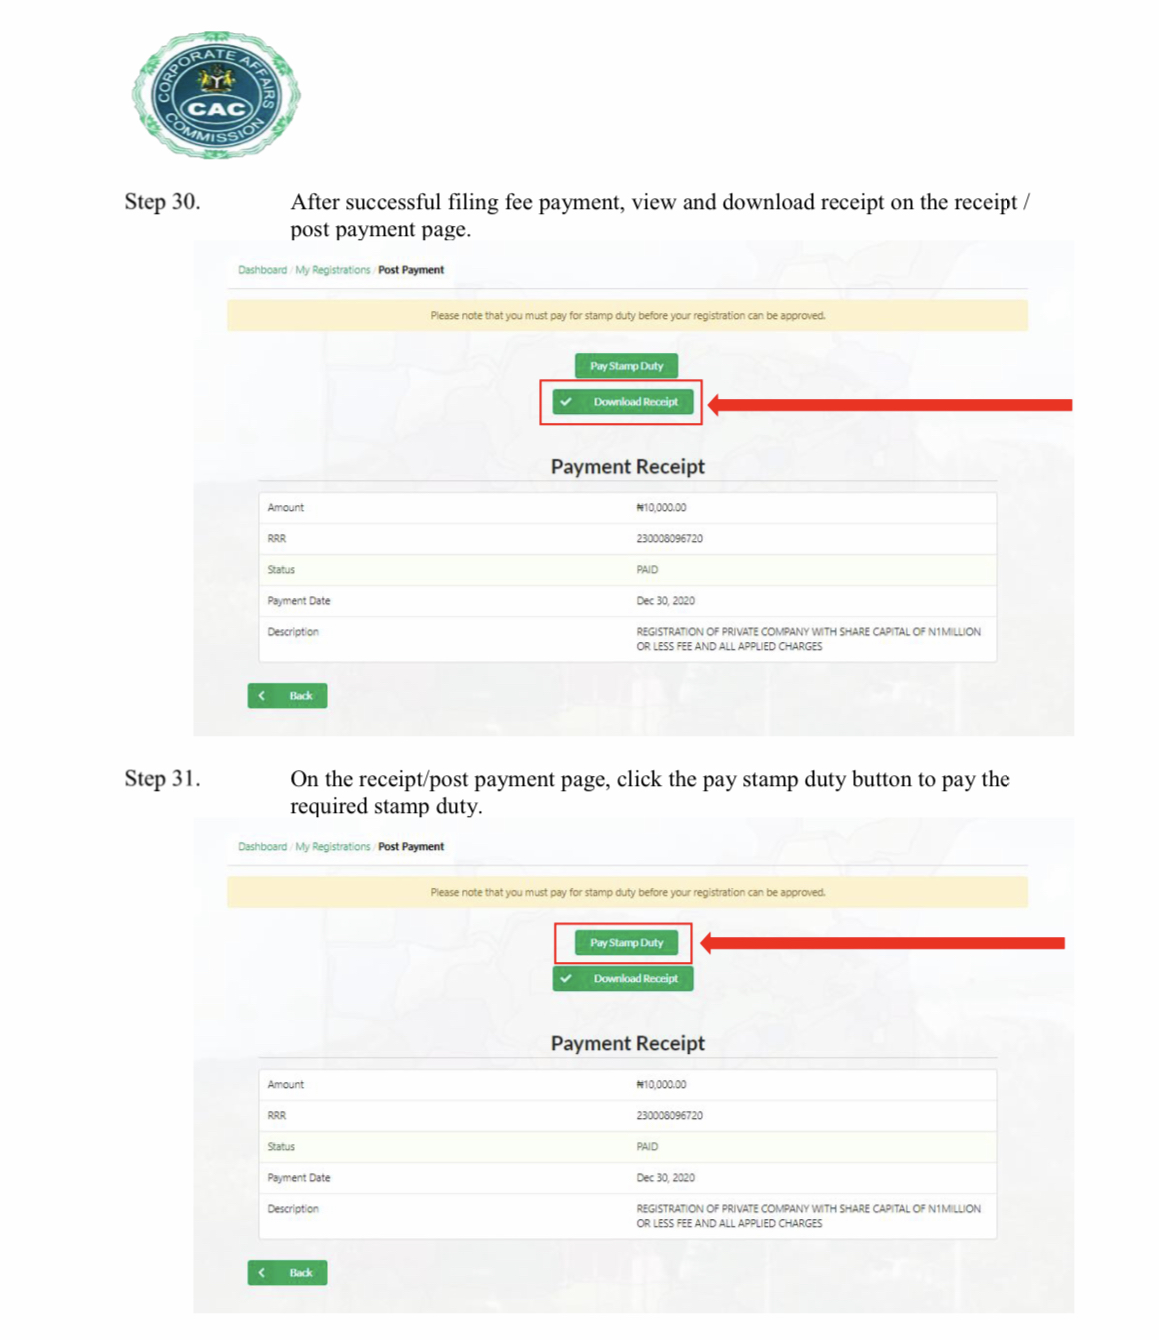
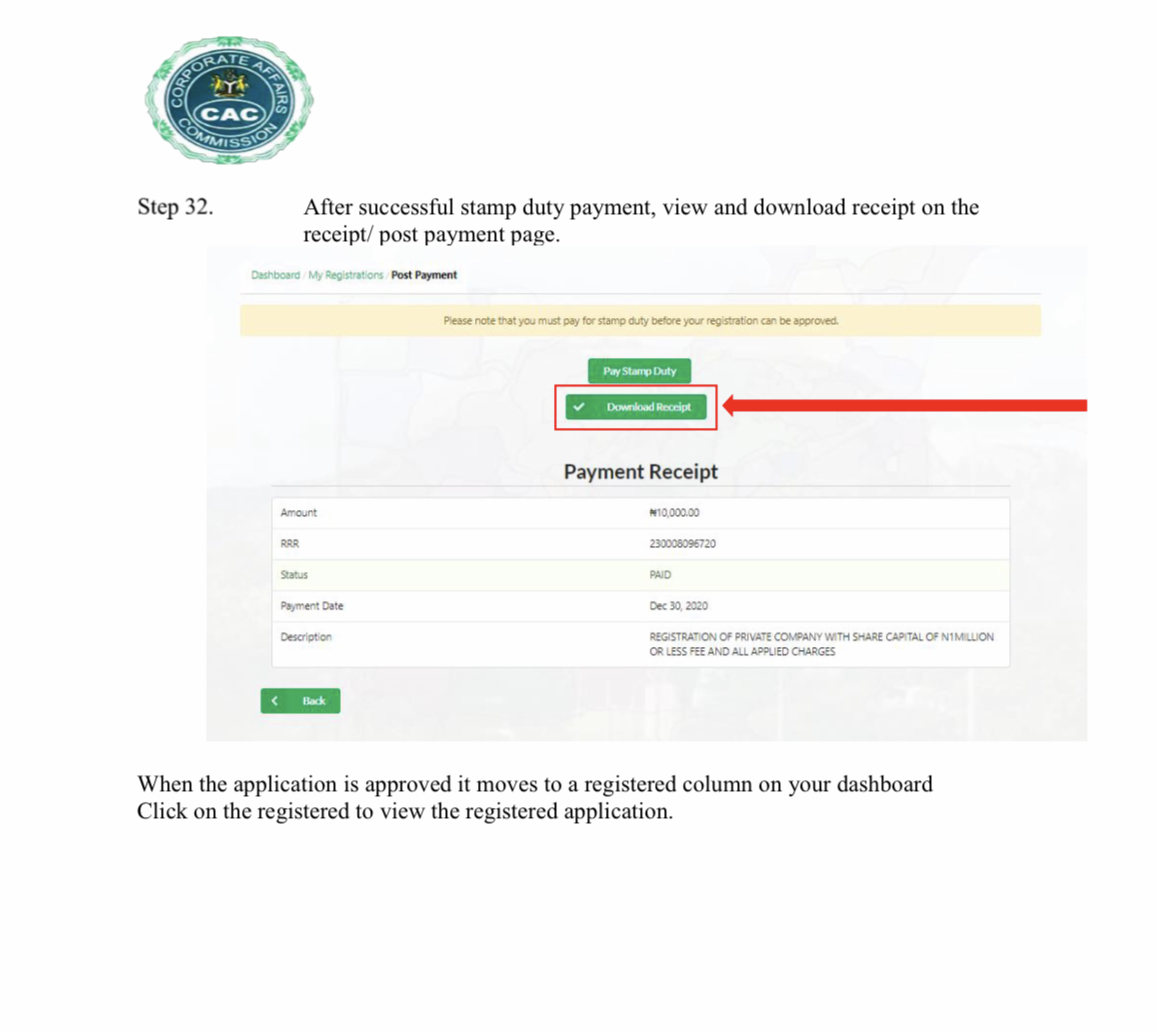
After paying the registration fee, you will have the possibility to download the receipt as well as paying the stamp duty fee. Without paying for the stamp duty, your application will not be process. The payment of stamp duty is as important as the payment of the registration fee. So to pay for the stamp duty, click on “Pay Stamp Duty” and follow the same procedure described for the payment of the registration fee. For better illustration, check the screenshots below.
After successively paying the stamp duty fee, you can also download the receipt on your dashboard. We’ve now come to an end to our CAC registration for a private company limited by shares. The next thing is to wait for the approval. Sometimes, CAC may query your application when necessary. So you are advised to log in your CAC account from time to time to check the status of your application. If it’s queried, comply and rectify what need to be rectified and submit the application again, and again till YOU get approval.
If you have any challenge in your registration process, kindly drop a comment below and I will attend to you without delay. You can also chat me directly on whatsApp.


